When you click on a page, scroll past this week's featured photo to view.

WELCOME!

This site is dedicated to sharing what we have learned with you! Enjoy our tutorials, and if you have a question please feel free to ask! I know one of our sugar enthusiasts will either know or try to find the answer.
We all have something to share...and we all have something to learn!


___________________________________________________________


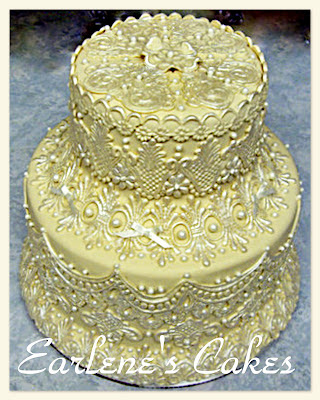
Nothing says Irish like Beautiful Lace

Nothing says Irish like Beautiful Lace
Click on photo for Earlene Moore's tutorial for beautiful fondant lace and have fun with your next cake!


.............................................................................................................................

/////////////////////////////////////////////////////////////////
.............................................................................................................................


Showing posts with label wedding cake. Show all posts

Tuesday, April 14, 2009

Calla Lilly Tutorial


Calla Lilies are really easy to make. I bought these cutters at an ICES convention in a set of 3.
But you can order these from D&G Occasions. Click on the pictures for a better view.
Make the pistils in advance and let dry. Roll a small sausage about the 2/3 the length of your cutter. If you are making natural looking calla's start with yellow paste. I use long toothpicks and insert after dipping the end in piping gel. After they are dry, brush them with a thin coat of piping gel and roll them in a little bit of massa cornmeal for a realistic look.

Roll the paste out but not really thin. Calla's are fleshy flowers so keep them a little thicker than other flowers.

I use this veiner to impress my calla. I purchased it at a DOS with Frost A Tiers. I got it from a vender, Noi. She was selling all kinds of veiners and I was lucky enough to get this one!

Impress the paste heavy enough that you can see the veins.


Place the paste on a pad to soften the edges with a ball tool. Some calla's are frilly and some are very smooth. I make each one a little different so they look as natural as possible.


I use piping gel on my flowers. It doesn't run and is very sticky and only needs a dab! Put the piping gel just on the bottom and barely up the sides of the flower.


Place the pistil in the center. Wrap the straighter side (look at your cutter - each are different but mine have two different shapes on the sides and it does matter which one I wrap first!) and wrap to the opposite side of the pistil. Wrap the other side and gently press with your fingers to make a tight bond. Can you see the dark burgandy calla just beyond my hand? That is a plastic flower that you can get at JoAnne's craft store. Pull the plastic stem/pistil out and you have a PERFECT flower former. I have quiet a few of those!


Place your flower in the former and use your fingers to gently roll the edges over the edge of the former. This will give your calla a natural look instead of a straight sides. Pinch the tip end together and curve down slightly. Let your lilies dry overnight if possible but I have used them pretty quickly after leaving them under a fan. They are just soft so be careful if you use them before they are dry. The calla lilies in this tutorial were used on a wedding cake that I made. They were dusted a silvery blue.
If you check out my website ( Cakes So Special ) you will see different colored calla's. I have dusted and airbrushed callas and used colored paste. There is no right or wrong way to do them.
Find the method you like best to make your own callas.

Photos and tutorial by Denise Talbot (Cakes So Special ) 2009 all rights reserved
This material may not be republished or reproduced in any manner without the expressed permission of the author.

Monday, March 2, 2009

10 Good Reasons To Rent a Wedding Cake


With the rising cost of weddings and the demand for new styles, many brides have started requesting a dummy wedding cake. At first, Jane at Singleton’s Kitchen, was not that enthusiastic about the idea, as she took much pride in offering many combinations of fresh baked wedding cakes . But after looking into the idea, and doing a few dummy cakes, she decided to be flexible and began to offer cake rentals to her clientale.


If you, as a cake decorator, are interested in a cake rental concept, here is a list of great reasons that Jane Singleton recommends to relay to your bride.

Why rent your wedding cake?

1. It's a better fit for the bride on a tight budget; she can have the cake of her dreams at a fraction of the cost. Sheetcakes can be cut in the kitchen and served to the wedding guest in lieu of a costly tiered wedding cake.


2. The bride has a better chance of booking her wedding date because the cakes can be assembled and decorated ahead of time.


3. Delivery and costly set up fees may be saved if the bride opts to pick up the display cake and sheet cakes before the wedding.


4. If planning an outdoor wedding, a dummy cake reduces worry of invading insects, bees or other pesky critters . It is also less susceptible to damage caused by high temperatures during the summer months; thus allowing the wedding cake to be prominently displayed during the reception from the beginning to the end.


5. Sometimes reception venues add a cutting fee into the package deals and the bride might be unaware she is paying for it. If the charge is per slice, that fee could add up to a hefty amount, sometimes as much as the price of the cake itself. By renting a dummy cake, these extra charges can be avoided.


6. The bride can order her dummy cake via the Internet having it shipped to directly to her home address. UPS is able to package and ship to insure a successful delivery.


7. One may choose to rent the wedding cake with an option to purchase.


8. The designs are limitless because dummies can be made in almost any shape.


9. No special clean up needed. Just return the cake intact to the decorator.

10 Now a bride can have her cake...and eat it too!


Jane Singleton 2009 all rights reserved
This material may not be republished or reproduced in any manner without the expressed permission of the author.

Tuesday, February 3, 2009

Creating a Floral Wedding Cake with a Flair

This is a cake I did recently for a wedding with a Tuscan theme. The grandmother and the bride made all of the flower arrangements and the backdrop of the cake. The cake sat on glass blocks that had gorgeous fabrics flowing through it. The cake was fairly simple. It had a grape impressed fondant border that was dusted with Frosted Lemon by ECG that is one of my favorites. A cascade of gum paste roses, calla lilies, grapes, 5 petal blossoms, grapes and fall leaves tumbled down the side. Flickering candles were placed on the corners of each cake and glowed so pretty. They were LCD lights.


I started by placing the candles on the cake. I attached them with a little bit of piping gel and fondant. Next I placed the grapes to cascade downward. I moved them several times to get the placement that pleased me.


Next I added the roses. I started with the smaller roses at the top and moved down the tiers with the larger roses. The roses are on long toothpicks so they are easy to anchor in the fondant. Move them if necessary. Do not line them up. Tilt the roses in different directions to give them a natural look. The more "relaxed" they look the more natural they will appear. Do not be afraid to pull them out and readjust even after the florals are complete. Be gentle with them but adjust if you feel it will give the arrangement a more pleasing look. Tuck the roses around the grapes and then add the calla lilies. Again, tilt at different angles to fit the arrangement.


Tuck in filler flowers in random spots on the edges and in between the flowers. Make plenty of filler flowers so that the arrangement has a balanced look.


The twigs are "fillers" too. Tuck them in at the edges and the ends of flowers to extend the arrangement. Tuck them in the middle of the flowers randomly. Bend to suit the situation.


Step back and look at your cascade from all sides. Does it please the eye? Does it flow? Move the flowers as needed. Several of the flowers in this arrangement were moved to suit the cake.


Tuck in the leaves on the ends and edges. Have them going in different directions so they flow.Tuck in between flowers, making sure they don't cover the flowers.


Add a few to the top of the cake and attach with buttercream or piping gel.


I hope this helps you in some way. Practice makes perfect. Get silk flowers and practice on cake dummies so you can feel confident when you are ready to place gumpaste flowers on a real cake.
Happy Decorating!


Photos and Tutorial by Denise Talbot. all rights reserved. 2009
This material may not be republished or reproduced in any manner without the expressed permission of the author.

Search This Blog

The Tutorials This Week Were Generously Shared by

RHONDA CHRISTENSEN, EARLENE MOORE, BOBBIE NOTO, EDNA DE LA CRUZ & TONI BRANCATISANO

And to ALL of our Readers...

Above all, have fun and keep baking!

Think CHOCOLATE!

A Very Sweet Tutorial by Bobbie Noto

A Very Sweet Tutorial by Bobbie Noto
I was instantly in love when Bobbie Noto shared this cookie with SugarTeachers! She is an amazing talent. For instructions on how to create this adorable cookie, click on the photo and don't forget to subscribe to Bobbie's website!

Pillow Cake Tutorial by Toni Brancatisano

Pillow Cake Tutorial by Toni Brancatisano
How beautiful! A great tutorial shared byToni Brancatisano. Click on photo to see the tutorial!

Pistachio-Cardamom Cake

Pistachio-Cardamom Cake
Click on link for Edna De La Cruz's dee-lish cake recipe.

Related Posts with Thumbnails