When you click on a page, scroll past this week's featured photo to view.

WELCOME!

This site is dedicated to sharing what we have learned with you! Enjoy our tutorials, and if you have a question please feel free to ask! I know one of our sugar enthusiasts will either know or try to find the answer.
We all have something to share...and we all have something to learn!


___________________________________________________________


Nothing says Irish like Beautiful Lace

Nothing says Irish like Beautiful Lace
Click on photo for Earlene Moore's tutorial for beautiful fondant lace and have fun with your next cake!


.............................................................................................................................

/////////////////////////////////////////////////////////////////
.............................................................................................................................


Saturday, December 29, 2018

Creating Scrolls on Your Cake by Denise Talbot


Scrolls 1


 Scrolls 2


Scrolls 3


 Scrolls 4


Tutorial by Denise Talbot
Copyright 2010- All rights Reserved

This material may not be republished or reproduced in any manner without the expressed permission of the author.

Thursday, December 20, 2018

Christmas Trees Tutorial


Supplies :


Waffle Cones for Ice cream

Small bowl with 1/2 inch water

scissors

Forest Green Royal Icing

Piping bag with #67
Piping tip

Yellow colored Gumpaste

3/4" Five petal or Star Cutter

Gumglue or piping gel

Wilton Pastel Candies
Dragees


Place two waffle cones together as shown.


Place in shallow water for 15- 20 seconds.


Remove from water and, using scissors, cut away soft edge of cone

until bottom edge is even and level.


Using royal icing, attach the cones to make "trees".

Starting at bottom of tree, begin piping leaves pulling out as you pipe.

Continue until you have filled the tree with "fir branches", leaving about 3/4" at top bare so you can move your tree into place. When the tree is placed where you want it on your cake or board, you can fill in the remainder of the top of the tree.

Roll out yellow gumpaste to about 1/4" thickness and cut out a star using your cutter. Place a yellow pastel candy on both sides of star, using gumglue or piping gel. Place on top of tree and secure with royal icing. Hold in place until firmly set.

Decorate your tree with colored pastels and dragees, securing with fresh royal icing if needed.


Photography and Tutorial by Jacque Benson
2009 copyright all rights reserved
This material may not be republished or reproduced in any manner without the expressed permission of the author.

Thursday, November 1, 2018

Fudgy German Chocolate Cupcakes


My daughter-in-law wanted something really chocolaty for her birthday.  I came up with this decadent fudgy, chocolate, almost German chocolate cake for her.  It was soooooo good!  I was glad that I left all of them at their house, which is a two hour drive from my house!  

Sorry for not having step by step pics!  I was in such a hurry to get these done!!


Ingredients:

Make in this order:


Coconut-Pecan Filling:

1 cup sugar
1/2 cup butter
1 cup evaporated milk
1 teaspoon vanilla
3 egg yolks
1 1/3 cups flaked coconut + 1/2 for toasting
1 cup chopped pecans

Mix sugar, butter, milk, vanilla and egg yolks in a saucepan.  Cook over medium heat, stirring occasionally, until thick, about 12 minutes.  Stir in 1 1/3 cups coconut and pecans.  Stir for a little longer, cover with plastic wrap and set aside.

Toast the 1/2 cup coconut in a pan until it just starts getting browned.


Ganache Icing:

12 oz. semi-sweet chocolate chips
1 cup heavy whipping cream
3 tablespoons real butter

Place chocolate chips in a large bowl.  Heat heavy cream on medium high heat until it just comes to a boil.  Immediately pour over the chocolate chips and stir until it is mixed and glossy.  Allow to cool while you make the cupcakes.


Chocolate Cake:

2 cups granulated sugar
1 3/4 cups all-purpose flour
3/4 cup unsweetened cocoa powder (I used half regular and half dark cocoa)
1 teaspoon salt
1 1/2 teaspoons baking powder
1/2 teaspoons baking soda
2 large eggs, lightly beaten
1/2 cup oil
1 cup whole milk
1 cup boiling water


Position rack in center of the oven and preheat to 350 degrees F.  In the bowl of a stand mixer fitted with the paddle attachment, combine the sugar, cocoa, salt, baking powder, and baking soda, mixing on low speed.  Mix in eggs, oil and milk.

Increase the speed to medium and beat for 2 minutes.  Reduce the speed to low and mix in water.  The batter will be soupy.  

Fill cupcake liners half way and bake for 12 - 15 minutes, depending on your oven.  Cool.


When cupcakes are cooled, cut a small hole in the middle with a knife and remove plug.  Fill with a teaspoonful of the coconut-pecan filling and replace plug.  Do with all cupcakes.

Being very careful not to lose the plug, dip the cupcake into the ganache to give it a coating.  Set aside.


Fudgy Frosting:

2 sticks butter
1 1/3 cups cocoa
6 cups powdered sugar
2/3 cup whole milk
2 teaspoons vanilla

Melt butter.  Stir in cocoa.  Alternately add powdered sugar and milk, beating on medium speed to spreading consistency.  Add vanilla.  

I then added any leftover ganache and beat to the consistency I wanted.  You may have to either add more milk or more powdered sugar to get the consistency you like.

With a bag fitted with the 1M tip, pipe a swirl on top of each cupcake.  After each icing swirl, sprinkle with the toasted coconut and left over pecans.

Enjoy!!


Rhonda Christenson
All Rights Reserved 2013
This material may not be republished or reproduced in any manner without the expressed permission of the author.

Monday, October 22, 2018

Hoot Owl Cookies....Hoot! Hoot!


When I was a little girl, my fondest memories are of my mother happily baking in the kitchen. And in the Autumn and Winter, she was baking every chance she could get. I remember once coming home from "trick 'r treating" to the smell of homemade raised donuts. Ooooh if you ever tasted my mother's donuts, it would ruin you for life on the donut shops!


This recipe for Hoot Owl Cookies is a refrigerator cookie. Mom used to make these around Halloween.
It comes from an Old Pillsbury Family cookbook, but I have adjusted the recipe a bit.


2-1/2 cups cake flour
2 tsp baking powder
1/2 tsp fine salt
3/4 cup butter
1 cup firmly packed brown sugar
1 egg
1/2 tsp madagascar vanilla
1/4 teaspoon Caramel Lorann Oil
1-1/2 squares unsweetened baking chocolate, melted and cooled
1/4 tsp baking soda
***
For decorating
Semi-sweet or Milk chocolate Chips for eyes
White Chocolate Chips or Cashews for beak

In a bowl, Sift flour with baking powder and salt. Set aside. In mixing bowl, cream butter with electric mixer at med speed , beat until creamy smooth, then gradually add brown sugar, incorporating well. Add egg, vanilla and Lorann Oil and mix well. Stir in flour mixture, adding 1/4 cup at a time until well mixed.

Divide cookie dough into thirds, and remove 1/3 dough. Stir baking soda into chocolate, then add to the 1/3 dough, mixing well. Cover and chill until the dough can be easily handled.


Divide the plain and chocolate dough in half. Return half of the dough to refrigerator.


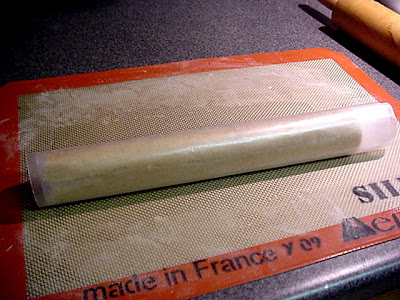
Roll the plain dough to a 4-1/2 x 10" rectangle on lightly floured wax paper. Roll the chocolate dough into a 10" long roll. Place the chocolate roll on the center of the rectangle

.

Lift the sides of the of the wax paper to roll cover the chocolate roll with the plain dough.

Wrap the wax paper around the dough and chill. Repeat process with remaining cookie dough.


Chill dough well, for at least two hours. I usually prepare the night before and allow to chill overnight for easier handling.
***************
Preheat oven to 350 degrees.

Cut the firmly chilled roll into 1/8-1/4" slices.


Place two sliced cookies touching in the middle on a greased cookie sheet or Silpat mat.

This creates the owl face with two eyes.

After all the cookies are placed on the cookie sheet, they will have softened. Pinch the top corners of the cookie to make ears.

If you want to make a Menacing Owl, push the top of plain cookie dough forward over chocolate dough eye, as shown.

Place one chocolate chip on each eye. You can place them with the point up, but I also like to push the pointed end of the chocolate chip into the cookie to create a flat pupil to the eye.

The original recipe calls for a cashew nut for the owl's beak. This is quick and easy, and once the cookies are baked and cooled, they will be ready to serve. But because nut allergies have become prevalent, if I am baking for a group other than my family, I wait until the cookies have cooled and add the beak later, using white chocolate.

Bake the cookies in a 350 oven for 8-12 minutes until lightly browned on the sides. Remove from oven and place cookies on a cooling rack.

When the cookies have thoroughly cooled, melt about 1/2 cup of White Chocolate chips. Spoon melted chocolate into a plastic pastry bag with a #8 tip.

Pipe a bead on the left side of bottom center, as shown. Repeat same step on the right side, the pipe over the middle, pulling down to the bottom creating a beak.


Allow the chocolate to completely cool and firm up.


You can make these look like cute Hoot owls, or if I make them look menacing,
my husband calls them Horned Owls.

To each his own.

Hey, it is Halloween after all! We can become anything we want on that day!!

Happy Hauntings!


Note:
The creator of this recipe is Natalie R Riggin

It was the 2nd Grand Prize Winner in the Pillsbury Bakeoff in 1956

The link to the original recipe

Thank you Natalie. This has been a family favorite for years!


Photos by Jacque Benson -2009 all rights reserved.

Tuesday, June 26, 2018

Pink Lemonade Cupcakes


To make these cupcakes, use any vanilla cake recipe that you wish, replacing the liquid in the recipe with pink lemonade concentrate, undiluted. You can also add a few drops of food coloring if you want it more on the pink side.


For the icing, use:


1 lb. unsalted butter (softened)
2 stick salted butter (softened
1 small pkg. lemon instant pudding mix
1 cup heavy cream
1 cup powdered sugar ( or more to suit your taste)
pink food coloring


In mixer set on medium speed, beat the butter until smooth and silky. Turn speed to low and add the pudding mix. when it is all incorporated, slowly add the cream, a little at a time. When fully incorporated bring speed up to high and beat for 5-7 minutes. Turn speed back down to low and add food coloring and add powdered sugar by tablespoons, tasting along the way. When it is sweet to your taste, beat again at high speed for a good 5 minutes to really break down any graininess that you might get from the powdered sugar. Bring back down to low speed and beat for a while to get rid of air bubbles. this recipe needs to be refrigerated. Bring it to room temperature before decorating or serving.


For this cupcake stand, I just used foamboard and cake dummies I found how to make this cupcake stand from Cake Journal.

Rhonda Christensen
2009
All Rights Reserved
This material may not be republished or reproduced in any manner without the expressed permission of the author.

Search This Blog

The Tutorials This Week Were Generously Shared by

RHONDA CHRISTENSEN, EARLENE MOORE, BOBBIE NOTO, EDNA DE LA CRUZ & TONI BRANCATISANO

And to ALL of our Readers...

Above all, have fun and keep baking!

Think CHOCOLATE!

A Very Sweet Tutorial by Bobbie Noto

A Very Sweet Tutorial by Bobbie Noto
I was instantly in love when Bobbie Noto shared this cookie with SugarTeachers! She is an amazing talent. For instructions on how to create this adorable cookie, click on the photo and don't forget to subscribe to Bobbie's website!

Pillow Cake Tutorial by Toni Brancatisano

Pillow Cake Tutorial by Toni Brancatisano
How beautiful! A great tutorial shared byToni Brancatisano. Click on photo to see the tutorial!

Pistachio-Cardamom Cake

Pistachio-Cardamom Cake
Click on link for Edna De La Cruz's dee-lish cake recipe.

Related Posts with Thumbnails