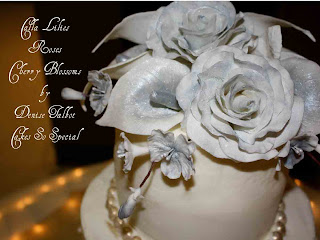
But you can order these from D&G Occasions. Click on the pictures for a better view.
 Make the pistils in advance and let dry. Roll a small sausage about the 2/3 the length of your cutter. If you are making natural looking calla's start with yellow paste. I use long toothpicks and insert after dipping the end in piping gel. After they are dry, brush them with a thin coat of piping gel and roll them in a little bit of massa cornmeal for a realistic look.
Roll the paste out but not really thin. Calla's are fleshy flowers so keep them a little thicker than other flowers.
 I use this veiner to impress my calla. I purchased it at a DOS with Frost A Tiers. I got it from a vender, Noi. She was selling all kinds of veiners and I was lucky enough to get this one!
 Impress the paste heavy enough that you can see the veins.
Place the paste on a pad to soften the edges with a ball tool. Some calla's are frilly and some are very smooth. I make each one a little different so they look as natural as possible.

I use piping gel on my flowers. It doesn't run and is very sticky and only needs a dab! Put the piping gel just on the bottom and barely up the sides of the flower.
 Place the pistil in the center. Wrap the straighter side (look at your cutter - each are different but mine have two different shapes on the sides and it does matter which one I wrap first!) and wrap to the opposite side of the pistil. Wrap the other side and gently press with your fingers to make a tight bond. Can you see the dark burgandy calla just beyond my hand? That is a plastic flower that you can get at JoAnne's craft store. Pull the plastic stem/pistil out and you have a PERFECT flower former. I have quiet a few of those!
Place your flower in the former and use your fingers to gently roll the edges over the edge of the former. This will give your calla a natural look instead of a straight sides. Pinch the tip end together and curve down slightly. Let your lilies dry overnight if possible but I have used them pretty quickly after leaving them under a fan. They are just soft so be careful if you use them before they are dry. The calla lilies in this tutorial were used on a wedding cake that I made. They were dusted a silvery blue.
 If you check out my website ( Cakes So Special ) you will see different colored calla's. I have dusted and airbrushed callas and used colored paste. There is no right or wrong way to do them.
 Find the method you like best to make your own callas.
Photos and tutorial by Denise Talbot (Cakes So Special ) 2009 all rights reserved
This material may not be republished or reproduced in any manner without the expressed permission of the author.


thank you for tutorial.
ReplyDeleteAwesome Tutorial! I'da never thought to use the flower like that. Your flowers are always fantastic!
ReplyDeleteDenise,
ReplyDeleteYour flowers are always so incredible! Thank you for sharing your process!!
I love the calla lily topper! OMG!
Fantastic tutorial, Denise!! I love your Callas!!! Beautiful!!
ReplyDeleteThanks girls! I appreciate your sweet remarks!
ReplyDeletewow Denise, the cake and the flowers are amazing! I especially love the tip about the flowers from the fabric store! when I did my wedding cake, I had a hard time figuring out what to dry them on...
ReplyDeleteWonderful tutorial, Denise! Thanks for sharing it! Your flowers are really beautifully done!
ReplyDeleteI cant wait to try these! Thanks!
ReplyDeleteVery good, can't wait to have a go.
ReplyDelete