When you click on a page, scroll past this week's featured photo to view.

WELCOME!

This site is dedicated to sharing what we have learned with you! Enjoy our tutorials, and if you have a question please feel free to ask! I know one of our sugar enthusiasts will either know or try to find the answer.
We all have something to share...and we all have something to learn!


___________________________________________________________


Nothing says Irish like Beautiful Lace

Nothing says Irish like Beautiful Lace
Click on photo for Earlene Moore's tutorial for beautiful fondant lace and have fun with your next cake!


.............................................................................................................................

/////////////////////////////////////////////////////////////////
.............................................................................................................................


Showing posts with label sugar flowers. Show all posts

Tuesday, July 21, 2015

Gingham Flower Topper Tutorial

Looking for a fun way to create a summer styled cake? When I think of summer, gingham comes to mind.
So I incorporated my love of summer gingham checks with fondant and flowers and ....here it is!


 SUMMER GINGHAM FLOWER TOPPER


Supplies:

Fondant- 1 lb. white
                ¾ inch ball of electric yellow
                8 oz. neon or electric Pink
                4 oz. neon or electric Green
                 ½ inch ball of black            
Orange petal dust
Bright green petal dust
Fondant Roller and Mat
Small stripes or gingham stencil
2 Clean Foam make-up wedges
Ruffled Heart cutter 2”
Heart cutter-1”
Gum glue
PME Wheel cutter
3” Leaf cutter
¾”, 1” and 3” circle cutter
Small blossom cutter
#2, 10 piping tube
Small scissors

Button


Roll out yellow gumpaste
 into thin layer.
 Cut a circle using a ¾” cutter. 
 Using the large end of
the #2 piping tube, 
make a slight indention
 in the circle.  


 Turn the piping tube over
 and make two or four holes
 in the center
 to create a button.


 Set aside to dry.


Flower

1. Roll out white fondant into a rectangle approximately 3”x 12”.

2. Lay stencil over the fondant 
and press into the fondant
 by gently rolling over the stencil.


Using the wedge foam applicator,
 apply a layer of orange petal dust
 over the fondant.
Lift the stencil, 
and wipe it clean 
with a paper towel.


Lay crosswise over the 
stenciled fondant 
and repeat process.


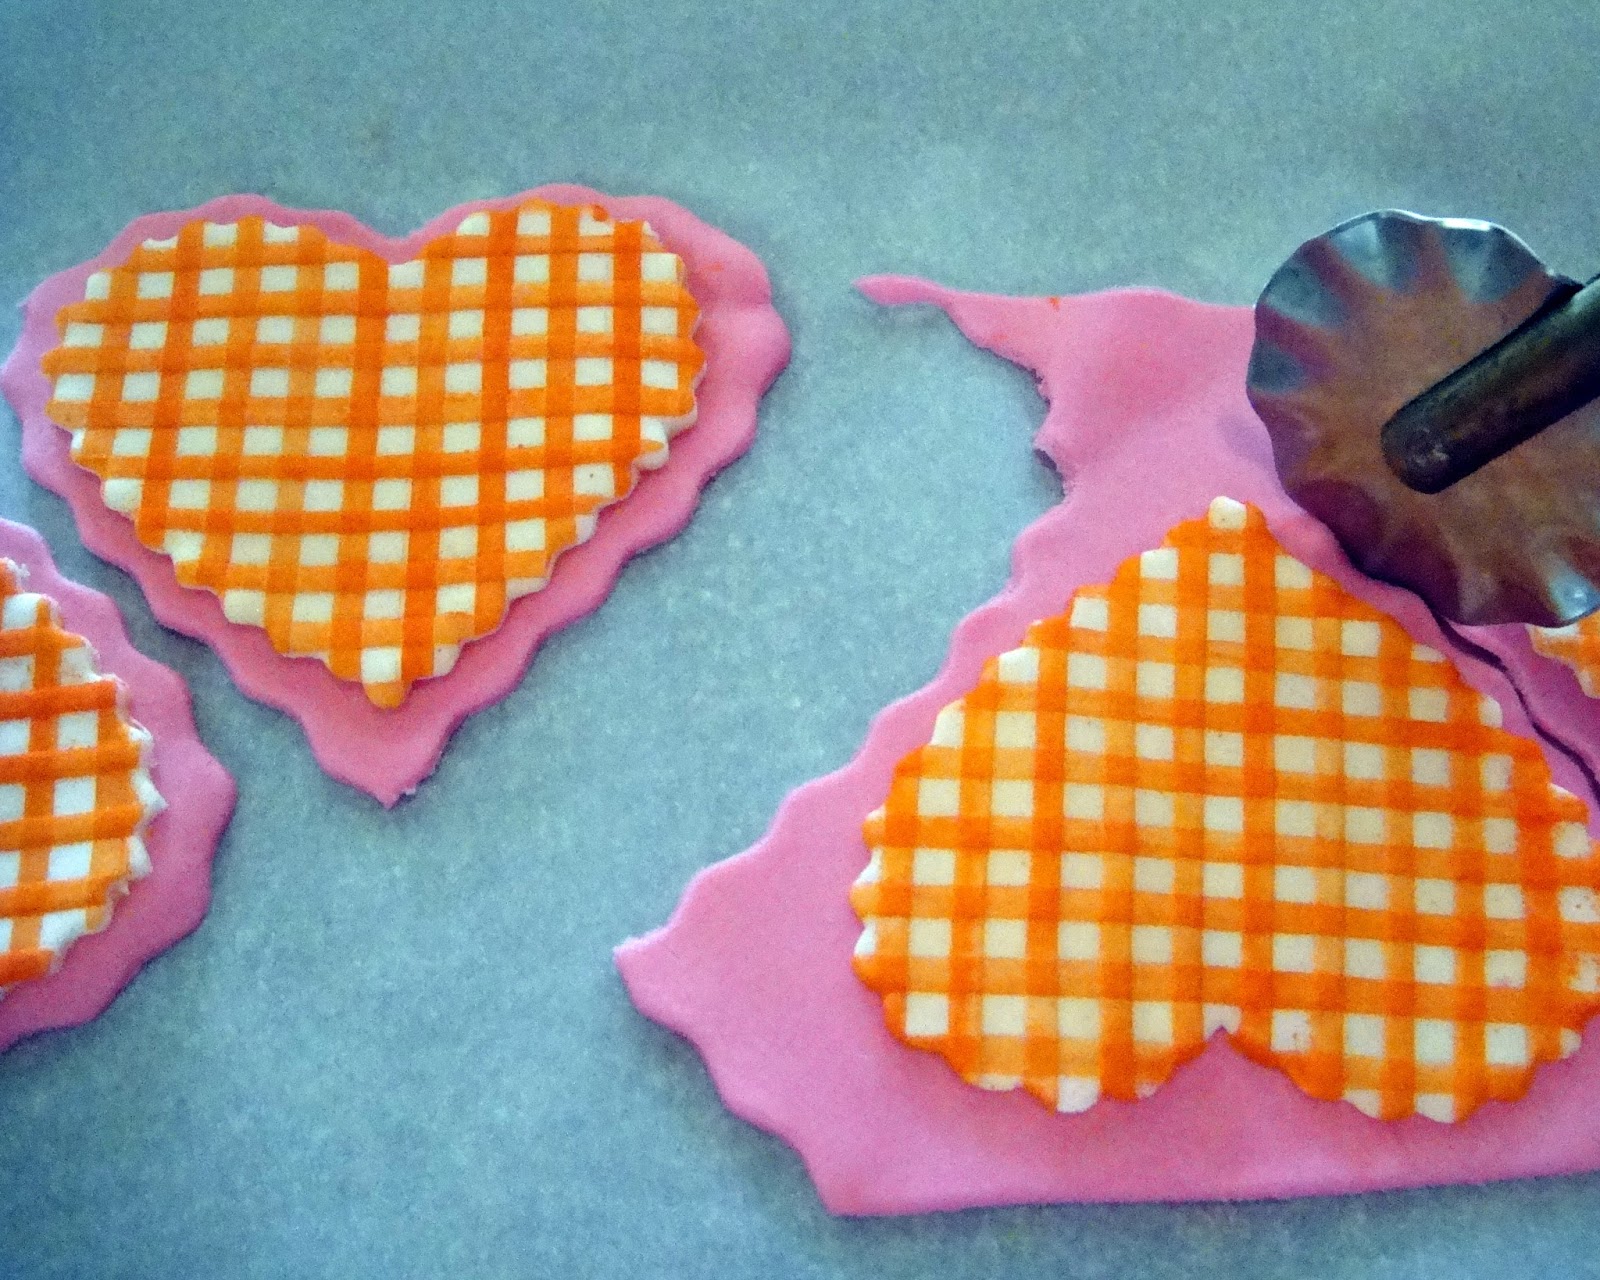
3. Cut 5 ruffled hearts,
 lightly cover with plastic wrap
 and set aside.
 4Roll out pink fondant approximately 5”x 12”. 
 Using your ruffled heart cutter,
 make an very light indention for a guide, 
then moisten the inside of the heart with gum glue.
Lay the patterned heart petal 
over the moistened fondant.  


Using a ruffled cutter or a PME wheel cutter 
and cut 1/8”away from the edge of heart petal,
creating a pink border. 
Repeat with the remainder of the petals.  

 Cover and set aside.
For smaller petals, roll out white fondant
 into a rectangle approximately 3”x 10”. 
 Press the clean stencil over the
 fondant in a diagonal. 
 Using the wedge foam applicator, 
apply a layer of of orange petal dust
 over the fondant. Lift stencil.

Repeat steps 3 – 4,
this time using a 4”x12” rectangle
of pink fondant.

Cover and set aside.

Thoroughly wash and dry stencil.


For the leaves, roll out white fondant
 into a 5” x 4” rectangle. 
Repeat steps 2-4 with green petal dust 
and green fondant using the leaf cutters.   

Cover and set aside.


To assemble flower:
Cut a 3” circle from white or pink fondant and moisten. 

Pinch the heart petals, 
as shown,
 then press into the
 center of the circle.   


Continue process,
overlapping the petals.


 Roll out a small amount of 
pink fondant and cut a 1” circle. 
Moisten with gum glue.

 Pinch the smaller heart petals, as before, 
then press into the center of the circle. 
Continue process, overlapping the petals


Roll out pink fondant and cut a flower,
 using the blossom cutter. 


Moisten the back and place 
 in the center.
Moisten center top with gum glue 
and place button in center of flower.

Attach the leaves, using gum glue,
 to bottom of circle.


Place cotton or 1” strips of rolled paper towels to give petals some lift. 
Set aside and allow to dry.

When ready, place on top of cake.


Jacque Benson. All rights reserved 2014
This tutorial and photography is the property of Jacque Benson- copyright 2014- and used with permission from the author. This material may not be used, copied or printed without expressed permission from the author, Jacque Benson.


Thursday, February 24, 2011

Marshmallow Fairy Flowers


Marshmallow Fairy Flowers
This was a tutorial published in Faerie Magazine.
Fun, easy, little flowers that you and your children can make together.


Items Needed:


Fruit Flavored Mini-Marshmallows

Granulated Sugar

Water

Rolling pin

Wax Paper

Toothpick

Clean Artist Brush

Clean Scissors


Rose Bud

1. Liberally sprinkle sugar onto wax paper. Using light pressure with rolling pin, roll out one green marshmallow. Flip and roll again into an oblong shape. Set aside.


2. Take three pink or orange marshmallows and press flat into sugar. Gently roll out each one, flipping and rolling again to create a round circle.


3. Line the three circles, over lapping edges about ¼”. Dip brush in water and lightly dampen the edges of the overlapped circles.


4. Placing the toothpick on one end, begin rolling the rose bud. Remove toothpick, and pinch one end of the rosebud together.

5. Using scissors cut off pinched end. (Place the cut end into an airtight container for later use.) Dampen the cut end. If petals release, just brush a bit of water to secure.


6. Lay rosebud on one side of prepared green oval. Brush a little water over the other side of green oval, and wrap the dampened side over the dry side.

7. Twist the bottom to create a stem.


Full Rose

1. Roll out green marshmallow in the sugar. Flip and roll again, creating a circle.


2. Using scissors snip a ¼” diagonal cut around the circle in a pinwheel fashion. Set aside to use as the calyx.

3. Follow steps 3-5, but this time using 5 to 7 marshmallows to create a full rose.

4. Lay the rose, dampened end down onto prepared green calyx. Using toothpick, gently open the petals for rose.


Flower

1. Following the same procedure as rose, roll out two yellow marshmallows into circles.

2. Using scissors cut six petals being careful to leave the center of marshmallow intact.


3. Dampen the center of one marshmallow, and place the second on top overlapping petals.


4. Using some of the saved used marshmallows from roses, pinch off a small piece and roll into a ball, then roll into sugar.


5. Dampen the bottom with water and place into center of flower.


Leaves

1. Roll green marshmallows in sugar to create an oblong shape.


2. Lay toothpick flat lengthwise over oblong and press gently.


3. Pinch both creased ends to create leaf.

.


For a little extra fairy sparkle, try using gold and silver dragees, or edible pearls as centers for flowers.


To create a richer look, make a rose using white marshmallows; gilding the edges of petals by lightly touching with a brush dipped in edible gold luster dust. Gilded white roses are especially pretty on chocolate cupcakes or cookies.


Your flowers can be made ahead of time, then placed on cookies, cupcakes, or petit fours when ready to serve. Just arrange the leaves and flowers on prepared confection, securing with a bit of fresh icing.

Oh... And don’t forget a leave a few out for the fairies before you go to sleep!
They love flowers!

This is a wonderful publication! Click to order!


Tutorial and Photos By
Jacque Benson 2010. All Rights Reserved
This material may not be republished or reproduced in any manner without the expressed permission of the author.

Search This Blog

The Tutorials This Week Were Generously Shared by

RHONDA CHRISTENSEN, EARLENE MOORE, BOBBIE NOTO, EDNA DE LA CRUZ & TONI BRANCATISANO

And to ALL of our Readers...

Above all, have fun and keep baking!

Think CHOCOLATE!

A Very Sweet Tutorial by Bobbie Noto

A Very Sweet Tutorial by Bobbie Noto
I was instantly in love when Bobbie Noto shared this cookie with SugarTeachers! She is an amazing talent. For instructions on how to create this adorable cookie, click on the photo and don't forget to subscribe to Bobbie's website!

Pillow Cake Tutorial by Toni Brancatisano

Pillow Cake Tutorial by Toni Brancatisano
How beautiful! A great tutorial shared byToni Brancatisano. Click on photo to see the tutorial!

Pistachio-Cardamom Cake

Pistachio-Cardamom Cake
Click on link for Edna De La Cruz's dee-lish cake recipe.

Related Posts with Thumbnails