When you click on a page, scroll past this week's featured photo to view.

WELCOME!

This site is dedicated to sharing what we have learned with you! Enjoy our tutorials, and if you have a question please feel free to ask! I know one of our sugar enthusiasts will either know or try to find the answer.
We all have something to share...and we all have something to learn!


___________________________________________________________


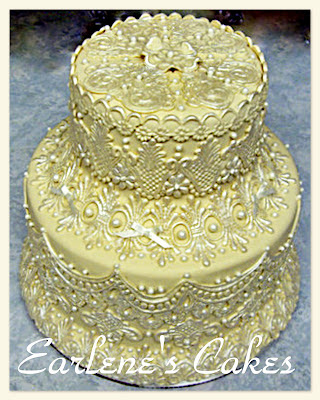
Nothing says Irish like Beautiful Lace

Nothing says Irish like Beautiful Lace
Click on photo for Earlene Moore's tutorial for beautiful fondant lace and have fun with your next cake!


.............................................................................................................................

/////////////////////////////////////////////////////////////////
.............................................................................................................................


Showing posts with label Samele Thorner. Show all posts

Monday, February 15, 2010

"C is for cookie...."

As I was on my semester break from school, I can honestly say the food item I thought of the most and made most often was a chocolate chip cookie. I didn't always make the same recipe, because I have a tendency to tinker, and try out multiple recipes to see if I can get the flavor and texture that I want. A chocolate chip cookie, to me, is the ultimate comfort food. Chocolate chip cookies are relatively easy to make, and they are quick, unless you want to chill the dough before baking, which is one of my favorite techniques.

I have seen numerous threads on the various forums I belong to, searching for the quintessential chocolate chip cookie. The purpose of this article isn't to tell you the recipe I think is best, but to give tips and pointers on how and why cookies turn out the way they do..


these cookies are the result of The Best, Big Fat, Chewy Chocolate Chip Cookie

COOKIE CHARACTERISTICS

Cookies usually have five basic characteristics. The desired outcome dictates the recipe components.

the characteristics are: Crispness, Softness, Chewiness and Spread

Crisp cookies are low in moisture. Softness is the opposite of crispness. Sometimes we confuse chewiness with softness, HOWEVER, all chewy cookies are soft, but not all soft cookies are chewy. Spread is basically how much the cookie holds it shape.


snickerdoodles (one of my faves)

GENERAL GUIDELINES FOR COOKIE CHARACTERISTICS
Crispness
***Most crisp cookies come from a stiff dough. There is a low proportion of liquid compared to other ingredients
***Crisp cookies have a high sugar and fat content
***longer baking time, evaporates more moisture in the recipe
***small size, cookies dries out faster during baking
***proper storage, if cookies are stored where they can absorb moisture they can become soft

Softness
***Hi proportion of liquid compared to other ingredients
***low sugar and fat
***include honey,molasses or corn syrup. these ingredients absorb moisture so they support a softer cookie
***underbaking the cookie will allow it to remain soft. Less moisture is lost
***larger size (also thicker) cookies retain more moisture
***soft cookies should be stored tightly covered or they can dry out

Chewiness
***High sugar/liquid, but low fat
***High proportion of eggs
***strong flour or gluten developed during mixing

Spread
***high sugar increases spread. regular granulated sugar (as compared to confectioners or superfine sugar) increases spread, like little ball bearings
***high leavening content (baking soda and/or powder) encourages spread
***the amount of "creaming" the sugar and fat increases spread. If you cream the butter and sugar until light and fluffy your cookies will spread more that if you take the same recipe and creamed those ingredients less
***low oven temp increases spread. Higher temps cause the cookie to "set up" faster before it has a chance to spread
***a thinner batter (high liquid content) spreads more than a stiffer batter
***strong flour or gluten developed decreases spread (using the same recipe with cake or pastry flour instead of all purpose will cause the cookies to spread more)
***heavily greased pans causes cookies to spread more

These tips are not all inclusive to every recipe ever developed, but they can certainly help you determine what a recipe should turn out like. On the recipe linked to above (Big, Fat, Chewy) I can point out 3 things that contribute to its chewiness.
1. one added yolk
2. more brown sugar than white sugar
3. the butter is melted, which caused the butter and sugar to just be mixed and not creamed

In addition, the baking recommendation is for 325 degrees and a 1/4 cup scoop..

Now, I just had the sudden urge to bake chocolate chip cookies! Stay tuned for troubleshooting tips!


Samele Thorner 2010 All rights reserved
This material may not be republished or reproduced in any manner without the expressed permission of the author.

Tuesday, June 30, 2009

Book Review--Planet Cake by Paris Cutler

First let me be the first to admit, I have a problem with books, not necessarily a bad problem unless you ask my husband.

So I was way too excited when I heard that Planet Cake had published a book. I looked and looked for a place to get it (and not have it take 18 years to get to me)

I finally found the book at The Book Depository they show your purchase price in US dollars and they offer free, yes FREE shipping, worldwide..(it only took a week) another place is Amazon also does worldwide shipping..

ok, ok, now to the book.

My first impression when I received the book was to swoon. It's high quality, in my opinion, from the point of view of a paperback..

The first section is called "How to use this book" I really appreciate this section because it gives insight into what Paris was thinking when she laid out this book. quite a few decorator's books are laid out according to their mindset and we set out to learn something, but find out it's only a photo album of their work (not that I have a problem with that either, it's just that sometimes I want to ogle and drool and sometimes I want to learn something)

The next section is called "Essential planning and preparation." It gives a timeline to plan and prep the designs. This is important because sometimes we procrastinate! Well, we still may procrastinate but at least we know what time frame things should happen! Following this section are photos and descriptions of items used in the book to decorate and common terms.

Paris gives recipes for cakes that are suitable for the designs in the book. As with all books, the recipes should be tested to see if you like them.

There is a general technique section that applies to every project in the book. This is great because it explains all the techniques that are used one time, in the beginning so space isn't wasted with every project.

There are various sections: cupcakes, round cakes, shaped cakes and 3d cakes, presented in that order. This may be a natural progression because the projects are harder as they go along.

The information for each project is thorough, and photos and drawings are presented to help the reader in completing the project. The language and the descriptions make it seem that anyone is capable of completing these projects.I love this book, even if it is just to look and wish. My only complaint is that I would love to see a section on topsy turvy (whimsical/wonky, whatever you want to call them) because they are quite famous for those (and the ganache technique that IS taught in the book).

Run (don't walk) to book depository, or amazon.co.uk and get this book!

Tuesday, April 21, 2009

The Making of a Louis Vuitton Purse Cake


SUPPLIES
~half sheet (13"x18"x1" pan size) cakes

~filling (buttercream or ganache type suggested)

~Fondant

~sugarcraft gun

~gumpaste

~luster dust

~cake board or foamcore

~serrated knife

~offset spatula


INSTRUCTIONS


When making any purse cake (replicating a real purse) I search for images of the purse, including the purse name and the dimensions. the LV Speedy 25 is around 10"x7"x6". Measurements are good to know so that if you need to rescale the purse smaller (or larger) it can still be proportionate to the original.
This particular cake was made to the actual size of the purse.I baked 3 of the half sheet cakes. I cut the cakes into strips 6 inches wide by 10, so about 3 strips per cake. you can either make sure you have enough full strips for the entire cake, or you can use the bigger scrap type pieces in the middle layers.


I cut 2 pieces of cake board. The bigger one for the bottom, it measured slightly smaller than the size of the cake, mainly because purses tend to have a curve on the bottom. the other board can be cut to the same size for this purse, but I usually cut slightly smaller for ease of carving.I placed my strips of cake and icing between them just as if icing a cake, however after my 3rd layer of cake, I place straws or dowels in the center, just 3 for this size cake, and then smear a little icing.


On top of the dowels, I place my second cardboard. I then finish layering my cake. Once done, you have just a rectangle of cake and icing.


as you can see here, I have 8 (I think :)) layers of cake.

The filling isn't very thick, just about 1/4 inch. I don't recommend using a slippery filling when carving/sculpting any cake.Chill the cake until it has firmed up and is ready to carve, depending on the cake, this time could vary.

At this point, I actually had a photo of the end of the purse, enlarged to the size I wanted the cake to be.
I used this as a template to carve my cake. If you are are in touch with your artistic side that day, you can wing it! When carving, I carved a straight line down the center of the first layer of cake, to indicate where the center was then I carved each side.. I learned that tip from Mike McCary's DVD ( He's one of my cake idols.. I have quite a few!!!)


Anywhoo..... once the cake was carved into the shape of the purse:
I covered it in buttercream and then chilled it again..From here on, I don't have any pics in process (sorry!) but here is what I did.

~make a zipper using a long rectangle strip.
I have seen many ways to make a zipper: using a mold, marking with a paring knife, or using the side of a jar to make the lines. Color the zipper portion gold and lay it on the top of the bag.(this is important to do first because I forgot and had to lift up my sides to fit the zipper in.. NOT FUN!!

~roll out fondant in rectangles, to cover the sides and ends.
I do this one piece at a time so the fondant doesn't dry. I roll out the longer sides first, but I'm sure it doesn't matter. Place the fondant up against the side you are covering and trim along the edge of the purse with a very sharp knife, xacto knife or razor, but make sure it's sharp so you can cut with a sliding motion, instead of a sawing motion. trim along the bottom, leaving just a little bit of excess so you can use a dogbone tool to push it under the cake. For the longer sides trim along the sides of the zipper you placed on the top. Do the same procedure for the remaining 3 sides.


~If you have an airbrush, this is the point where you would airbrush your cake.
You can airbrush from white to brown, or you can start with beige or brown fondant and airbrush from there. If you don't have an airbrush, I suggest using chocolate fondant. I personally HATE coloring fondant brown..


~check your photos to see if any details are under the seams.
 On this purse, it looked like the little tab on the end was under the seam, so I cut that out and applied it before I did the seam.~once all 4 surfaces are covered, soften some fondant with shortening and use your extruder with the round opening to make strips. glue these lines to the edges where they join, you can use water, but I like to use tylose glue. (tylose powder with water added) I try to make one long piece to cover, but if not, you can smooth the seams with some water and a palette knife or offset spatula


~LV has a very specific pattern.
 On this cake, my emblems are larger than they would be on a purse, but I tried to stick to the pattern, except in the spot where I got off.. hey every cake has a back right??!! I hand painted these emblems on with gold luster and lemon extract. there are also cutters that are similar to the shapes. using and edible image is also an option. This is part where you can get creative. Sometimes we like items to look like exact replicas, but I have come to realize that it is an ARTISTIC REPRESENTATION, and therefore does not have to be exact. I'm sticking to it!


~if you notice on this bag,
 the handles aren't at the top of the bag, so while I'm sure it would be possible to make hard handles standing up, I felt like it would be easier to make them hanging down. If you wanted to do them standing up, I would suggest gumpaste handles made in advance of course. Elisa Strauss has instructions on how to do handles in her confetti cakes book. and I'm sure you could google.. google is my friend when making cake! So for these handles, I first made the shapes of the leather patches that are stitched on the bag. for the gold metal circle, I just cut a circle of fondant with a round tip and painted it gold. I made the handle with a rectangle folded in half and stitched on the edge.


These handles also have a distinct way they come together over the hardware so to replicate that I made the end of the handle fold over where the hardware would be and stitched it. I glued the handle to the leather patches. Because the handles are not standing up, the hardware is just an illusion. I made 2 thin sausage shapes out of modeling chocolate and stuck the ends in the opening on the patch and the opening in the handle. I then painted them gold

.~make any other hardware that comes on the purse that you want to make. and voila! a purse!
here is another LV purse I made, different shape, pretty much the same procedure


Photos and Tutorial by Samele Thorner 2009. All rights reserved.
The tutorial or patterns cannot be reproduced for commercial purposes without permission from the author.

Monday, December 8, 2008

Scratch Baking Tips (and troubleshooting too!)


I know that sometimes it seems like it is WAY to hard to bake from scratch, or just easier to use a mix, but really, it's not!

I been baking for 20 years (I like saying it that way, makes me feel "experienced"!) and although things sometimes still go awry. I think I am pretty good at it.. sooooooo here are a few tips and troubleshooting items.

~ use an oven thermometer- this is true no matter if you are baking from scratch or a mix. Ovens can be "off" so you want to make sure that you are baking at the proper temperature.

~ FOLLOW THE RECIPE- baking is alchemy, it is not like cooking where you can just substitute things all willy nilly in the recipe! (I tell my friend that all the time) If you want to try a recipe, try it the way it is written the first time. Once you get an understanding of what the writer intended then you can tweak it to your liking. Joyofbaking.com is a good reference for ingredients in baking and their purpose. Baking soda and baking powder are two different animals, you can't just sub one for the other.

~when making a "butter" cake (as in not a sponge or foam cake) there are multiple mixing methods you can use, the most common being the creaming method. I use room temp butter and eggs, but if you don't you will need to cream your butter and sugar for a longer amount of time. The butter/sugar mixture should be light in color and increased in volume. I also add my eggs on medium (4 on my 4.5 quart kitchenaid and 2 or 4 on my 5 quart kitchenaid). count for about 20 seconds between adding each egg so that it is fully incorporated. (the eggs, not being fully incorporated could result in a tough cake)

~when adding the dry ingredients, add them in at LOW speed on the mixer, you could even mix by hand, but I am usually making too much cake for that! you don't want to overmix which could result in a tough cake which brings me to troubleshooting


***My cake has pulled WAY away from the pan and kinda dips in the side****
this is usually caused by too much liquid. The recipe could be incorrect or your measurements could be off.

***My cake has big holes (or tunnels) in it***
This is usually the result of overmixing, which affects the cakes structure

*** My cake is 'gummy' or has a dark line in the middle***
the cake has "fallen" which means that the structure was not strong enough. this could be caused by many things such as overmixing/undermixing, oven too high, which caused the cake to rise but not be completely baked

the best advice I can give when baking from scratch is to pay close attention to the recipe and don't leave the kitchen to do other things.. (ASK ME HOW I KNOW)

Baking Tips by Samele Thorner
All rights reserved 2008
This material may not be republished or reproduced in any manner without the expressed permission of the author.

Search This Blog

The Tutorials This Week Were Generously Shared by

RHONDA CHRISTENSEN, EARLENE MOORE, BOBBIE NOTO, EDNA DE LA CRUZ & TONI BRANCATISANO

And to ALL of our Readers...

Above all, have fun and keep baking!

Think CHOCOLATE!

A Very Sweet Tutorial by Bobbie Noto

A Very Sweet Tutorial by Bobbie Noto
I was instantly in love when Bobbie Noto shared this cookie with SugarTeachers! She is an amazing talent. For instructions on how to create this adorable cookie, click on the photo and don't forget to subscribe to Bobbie's website!

Pillow Cake Tutorial by Toni Brancatisano

Pillow Cake Tutorial by Toni Brancatisano
How beautiful! A great tutorial shared byToni Brancatisano. Click on photo to see the tutorial!

Pistachio-Cardamom Cake

Pistachio-Cardamom Cake
Click on link for Edna De La Cruz's dee-lish cake recipe.

Related Posts with Thumbnails