When you click on a page, scroll past this week's featured photo to view.

WELCOME!

This site is dedicated to sharing what we have learned with you! Enjoy our tutorials, and if you have a question please feel free to ask! I know one of our sugar enthusiasts will either know or try to find the answer.
We all have something to share...and we all have something to learn!


___________________________________________________________


Nothing says Irish like Beautiful Lace

Nothing says Irish like Beautiful Lace
Click on photo for Earlene Moore's tutorial for beautiful fondant lace and have fun with your next cake!


.............................................................................................................................

/////////////////////////////////////////////////////////////////
.............................................................................................................................


Monday, December 5, 2022

Sugar Cookies

Sugar cookies are my families favorite thing to make. We try to make them for every occasion you can think of. My daughter and I are getting requests for these cookies now because they are so good but no one wants to take the time to make them. So if you have the patience and time, here is how we do our cookies!!


Rhonda's Sugar Cookies


3 cups all-purpose flour

1/2 teaspoon baking soda

1/4 teaspoon salt

1 cup butter

2 eggs

1 cup sugar

1 teaspoon vanilla

Sift together the flour, baking soda and salt. Add the butter and mix like you would pie crust.


In another bowl, beat eggs. Add sugar and vanilla and beat well. Combine with dry ingredients. The dough will be a little crumbly at this stage. I really like this recipe because you don't have to refrigerate it!! (I don't like waiting!)


This dough can be rolled out or shaped into balls and pressed with a fork or glass that has been dipped in sugar. We like to do both!!


Take some dough and knead it a little before you roll it out. I like to roll mine fairly thick. Thinner for crispy cookies and thicker for cookie bouquets.

I have to show you my "handicapped" rolling pin!! (I have RA). Cut out your cookies as desired and place them on an ungreased cookie sheet.


Bake cookies in a 350 degree oven for around 9-12 minutes, depending on the thickness of your cookie. As soon as the cookies come out of the oven, I take a fondant smoother, (or any flat, solid object) to make the cookies flat. The reason for doing this is so that the icing will stay on the cookie better and not run down the sides.


Cool the cookies for about 15-20 minutes and put them in an air-tight container.


I like to use this container I found at WalMart. It's a cake taker, but I use it for cookies and cupcakes.


Next comes the icing. I love to use a glaze most of the time but Royal Icing may also be used. Sometimes I do both!! The glaze recipe below is just for a small batch. I usually quadruple it!


Cookie Glaze


1 tablespoon corn syrup

1/4 cup warm water

1-2 teaspoons flavoring (almond, vanilla or your favorite)

3 cups powdered sugar

food coloring (paste)


Dissolve corn syrup in the warm water. Mix in extracts and add sugar until you have a smooth glaze. Add more to thicken or more water to thin. A lot depends on the humidity and where you live. Use the thicker for outlining and thinner for filling in. If you are familiar with color flow, it's the same technique. Your fill-in icing should disappear into itself at the count of 10.

I love to use these squeeze bottles for the thicker outlining part. They are mostly used for candy making or condiments. I then thin out what is left in the bowl with a little water and spoon that onto the cookie. If using different colors, (one for outlining and one for filling in) let the first color dry for an hour or so before decorating with the second color. Otherwise, your colors will bleed. Once dry, you can then decorate on the top of the first layer with more glaze, royal icing or food coloring markers.


Outline first then quickly fill in so that there is no distinguishing outline.


Once you get the hang of it, just have fun being creative!! There are all kinds of possibilities!!


Photos and Tutorial by Rhonda Christensen. 2009. all rights reserved


This material may not be republished or reproduced in any manner without the expressed permission of the author.


Monday, July 11, 2022

Footprints in the Sand


This cake is a walk on the beach, so to speak!


Ingredients
Cake Covered in Ivory Fondant
Granulated Sugar
Demera Sugar
Super Pearl Dust, Food Grade
small amount of ivory fondant
Small amounts of  bright blue, hot pink and orange gumpaste
Piping Gel

Tools
Card Stock
Scissors
Toothpick
GumGlue
Parchment Paper
Fondant Roller
 Flat Artist Brush
Impression Mats
Plastic Piping Bag

Instructions

Flip-Flops
1. Cut out a pattern using cardstock. The pattern is about 1" long.
2. Roll out bright blue gumpaste very thin. Place your flip-flops pattern over gumpaste. Using a PME wheel cutter, cut around pattern to create sole of flip-flops . Turn pattern over and cut another sole.


3. Place a wave pattern impression mat over the soles. Gently impress pattern onto the tops of soles. Cover and set aside.


4. Roll out a hot pink gumpaste. Using #12 piping tip, cut two circles. Make indentions using a leather punch or toothpick.


5. Roll out a bit more blue and cut two dot using the tip of #6 piping tip. Moisten the center of the pink with a bit of gumglue and place the blue dot in the center, as shown.


6. Using a SugarCraft Clay gun and the smallest cord disk, make an orange cord.


Cut into two ½” lengths. Pinch the center together.


7. Using toothpick, Make an indention in the soles of the blue gumpaste, the lightly moisten the indentions with gumglue.

Place the pinched center of the cord at the top of the sole, and the ends at the sides.


8. Place pink flower at the top of flip-flops, attaching with gumglue. Cover to protect and set aside.


Footprints
1. Using the cardstock flipflop pattern, cut 8 footprints out of parchment paper.


2. Roll ivory gumpaste very thin. Place 6 of the parchment patterns over the gumpaste, and cut using the PME wheel cutter.

3. Mix a small amount of ECG Frosted Lemon and Sombrero luster dusts together and dry brush over each gumpaste footprint.


4. Place an impression mat over the gumpaste and gently press.

5. Cover to protect and set aside.


Sandy Beach Cake
1. Mix 1 cup granulated sugar with ½ tsp ECG Frosted Lemon , ½ tsp Sombrero Luster Dusts, ¼ tsp. super Pearl dust. Add ¼ cup demera sugar. Mix well and place into Plastic Piping Bag.


2. Cover Cake with Ivory Fondant.

3. Brust fondant with Piping Gel.


4. Place the 8 parchment footprint pattern over piping gel, as if walking up side of cake.*

5. Place cake inside 14” Cake Pan to catch unused sugar. Cut end from piping bag and began covering cake with sugar in uniform style until the cake is completely covered.

6. Remove the parchment patterns.


7. Place the 6 footprints over the exposed piping gel, then place the flip flops over the last two footprints at top, as shown.

8. Sprinkle more sugar around the top of the cake.

Remember the beachy topper tutorial? Now you have the perfect cake for the Beach Themed topper. Place on top of cake with a little sugar sand spilling out of sand pail.

The sugar will sparkle just like sunlit sand.


Here is a picture of a Fun in the Sun cake that was created by three artists!

Photo by Sherilyn Vineyard-2010

I had the privilege of demonstrating this as the top tier of a three tiered cake. The middle tier was created by the very talented Sherilyn Vineyard; and the bottom tier and cake board by the uber creative Sylvia Wilson. We all built our tiers separately, then assembled them at a Day of Sharing. We were thrilled with the way it all came together!


Hope you have Fun creating your own Summer Fun Cake!!


* this tutorial is for one side of cake only. If you want to repeat the pattern on the back side of cake, you will need to make two pair of flip-flops and 12 footprints.

Tutorial and Photography by Jacque Benson
Copyright 2010-All rights reserved

This material may not be republished or reproduced in any manner without the expressed permission of the author.

Tuesday, March 8, 2022

St Patrick’s Day Pistachio Candy


Ingredients:               
  • 1 14oz. can sweetened condensed milk
  • 1 3.5oz pkg pistachio pudding mix                            
  • 6 oz bag flaked coconut                                                         
  • 2T butter or margarine, melted (1 ounce)
  • 8 oz cream cheese, softened  
  • 2 cups finely chopped pistachios
  • 5 ½ -6 cups sifted confectioners' sugar
  • 1 drop leaf green coloring gel (opt)                                                   
  • Semisweet and/ or white Chocolate chips , melted
  • Paramount Crystals
  • 1/2 cup Dark Green Confectioners Melts

Preparation:

Pour sweetened condensed milk into a bowl. Heat milk in microwave for 1 minute until warm. Pour pudding mix into milk and stir well.  Return to microwave and heat for 60- 90 seconds, checking after 60 seconds so as not to overcook. Stir again for 2 minutes until the pudding mix is well dissolved. Set aside.

Place coconut in blender and pulse a bit until the coconut is finely chopped. Mix with finely chopped pistachios.

Stir butter and cream cheese into pudding mixture, incorporating well. Add nuts and coconut and mix well.
I added a drop or two of leaf green coloring gel just because it's St Paddy's Day candy, but it's not necessary.


Add confectioners’ sugar, 1 cup at a time until too difficult to stir.  Sprinkle a board generously with confectioners’ sugar and turn the mix onto the board. 


Knead in sugar
until the dough is soft and not sticky.


Using a melon baller, scoop out a heaping teaspoon of dough. Shape into 1 inch balls, then chill in refrigerator until very firm.

When ready to dip in chocolate, melt semisweet and/or white chocolate .

I used Ghiradelli brand chocolate chips.  I also added some paramount crystals to
thin the chocolate.
 Too thick a layer of dark chocolate will overwhelm the flavor.

When melting white chocolate, melt carefully over hot water in a double boiler.

Do not allow the water the boil as the white chocolate burns easily.


Because this was for St Patrick's Day, I added 5-6 dark green Confectioner's melts at the last
making a pretty soft green.


 Dip chilled balls into melted dark or white chocolate using a fork.

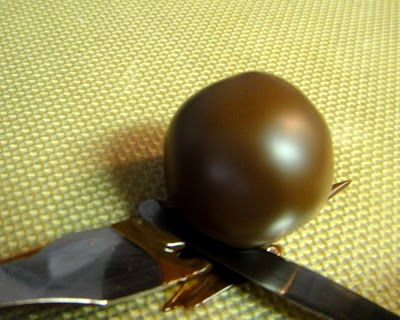
Then carefully slide off the fork onto wax paper or a silicone mat using a small spatula, as shown.
Set aside to cool completely.
To decorate, melt about a 1/3 cup of green confectioner's melts.
Pour into a piping bag and clip just the tip off the bag.
Have fun decorating your candy.
I used stripes on the dark chocolate and swirls on the white chocolate.

Mmmmmmm -Chocolate on the outside,
gentle flavors of pistachio and coconut on the inside!


With this candy, there's plenty of Green on hand for St Paddy's Day!


May you have:
A world of wishes at your command.
God and his angels close to hand.
Friends and family their love impart,
and Irish blessings in your heart!


************************************


Recipe, Tutorial and Photography by Jacque Benson 2011
All Rights Reserved.
Please note
This material may not be republished or reproduced in any manner without the expressed permission of the author.


Search This Blog

The Tutorials This Week Were Generously Shared by

RHONDA CHRISTENSEN, EARLENE MOORE, BOBBIE NOTO, EDNA DE LA CRUZ & TONI BRANCATISANO

And to ALL of our Readers...

Above all, have fun and keep baking!

Think CHOCOLATE!

A Very Sweet Tutorial by Bobbie Noto

A Very Sweet Tutorial by Bobbie Noto
I was instantly in love when Bobbie Noto shared this cookie with SugarTeachers! She is an amazing talent. For instructions on how to create this adorable cookie, click on the photo and don't forget to subscribe to Bobbie's website!

Pillow Cake Tutorial by Toni Brancatisano

Pillow Cake Tutorial by Toni Brancatisano
How beautiful! A great tutorial shared byToni Brancatisano. Click on photo to see the tutorial!

Pistachio-Cardamom Cake

Pistachio-Cardamom Cake
Click on link for Edna De La Cruz's dee-lish cake recipe.

Related Posts with Thumbnails