When you click on a page, scroll past this week's featured photo to view.

WELCOME!

This site is dedicated to sharing what we have learned with you! Enjoy our tutorials, and if you have a question please feel free to ask! I know one of our sugar enthusiasts will either know or try to find the answer.
We all have something to share...and we all have something to learn!


___________________________________________________________


Nothing says Irish like Beautiful Lace

Nothing says Irish like Beautiful Lace
Click on photo for Earlene Moore's tutorial for beautiful fondant lace and have fun with your next cake!


.............................................................................................................................

/////////////////////////////////////////////////////////////////
.............................................................................................................................


Tuesday, August 23, 2011

Sugar Glass Butterflies by Jennifer Dontz


I am SUPER excited to bring you this tutorial. This extremely EASY process, makes the most beautiful crystal look butterflies and leaves I've ever seen.

Let's get started!

1. Using isomalt sticks, melt them in the microwave. You need a container that will take the hot sugar. Be careful not to burn the sugar. Cook it just until melted. Once melted, let it sit on the counter for a couple minutes. This will bring the air bubbles to the surface.

ALWAYS wear some sort of glove when working with hot sugar. You can easily whip that glove off, but not your skin, if you get some on it :-) I like to use the Wilton measuring cups. They work well for me, but I am not endorsing them. Use at your own risk. 

Pour one of each side of the butterfly wings. You can use Americolors to color your sugar. Drop color into hot sugar, wait for it to stop sizzling and then gently stir it in.

Here's a link to the isomalt sticks.    
Isomalt Sticks
(This link is to the clear ones but we also handle some very pretty colors as well.)


2. Taking a Show Peel mat, pour some of the hot sugar on to the surface and quickly spread it to all the out edges of the mold, using a toothpick.


If it hardens to fast, you can quickly take a small torch like a cream brulee torch, and heat it back up. You shouldn't hurt the mold if you do it quickly. Let it dry.

Here's a link to the mini bugs Show Peel:


3. Peel the mold off and you now have two butterfly wings.


4. Taking the two wings, dip each one just a bit down at the center of each wing where it would touch the body, into the hot sugar. I would say dip it around 1/8" into the hot sugar. Taking the two wings press them together in the middle and the sugar will compress and make a body. Do this directly on the Show Peel mat or a silpat mat if you have one. At this stage you could add some stamens if you wanted. We just got in some super fine stamens from overseas. They are very hard to find and would be perfect for this.

Here's a link to the stamens:


Isn't it simply GORGEOUS!!! I put the vein side down but you can put them together however you wish. Here's one on a cake (you just attach it with a small amount of hot sugar):


We also have another Show Peel mat that has gorgeous leaves on it.
You could make beautiful crystal leaves for your wedding cakes.


It's the same process as above. If you take the piece off of the mat while it's still a little warm, you can gently bend and conform it they way you want the shape to be. Or you can hit it with the torch as well.


You can do this with the butterflies as well if you don't want the wings perfectly straight.

Here's a link to the beautiful assorted leaf Show Peel

Keep in mind, both of these mats have several shapes/forms on them. If you click on the picture on our site, it will give you an idea of size. Each mat is about the size of a normal piece of paper. Here's the mini bugs mats up close:


And the assorted leaves: (I think the leaves with the bubble in them would look great on seaside cakes)


Also, some tips when working with sugar:

  1. You shouldn't take a container that has hot sugar in it and then add cold sticks to remelt in the microwave. 
  2. All sugar in the container needs to be the same temperature. You can burn the sugar that is already hot by doing this. 
  3. In order to keep the nice shine to these, you need to do one of the following. Either spray with with edible lacquer or brush clear confectioners glaze on it or mix a 50/50 mix of baking soda and vodka and apply.   I have not tried any of the above, but will be trying all of them :-) 
  4. Also, isomalt is diabetic candy. So if someone wishes to eat it, they should only eat a small amount. Consuming a bunch can give one a stomach ache.

Have fun with this!
What a wonderful, EASY method for creating hot sugar pieces without the hassle of cooking to temperature. 

I'm am quite sure you will WOW your customers with these!

I hope you enjoyed the tutorial.


*************************************

This tutorial was published with permission of Jennifer Dontz / SugarDelites Copyright 2011
The material and photos contained in this post may not be copied and republished in any form without permission from the author.

Monday, August 15, 2011

Strawberry Cake with Strawberry Cream Cheese Frosting


This is by far one of the best Strawberry cakes out there!
It is moist and bursting with flavor not to mention the cream cheese icing that puts it over the top .
You have to admit it looks awful pretty too!


Strawberry Cake with
Strawberry Cream Cheese Frosting


Ingredients

1 18.25-ounce box white cake mix
1 3-ounce box strawberry-flavored instant gelatin
15 ounces frozen strawberries in sugar, thawed and pureed
4 large eggs
1/2 cup vegetable oil
1/4 cup water

  • Combine cake mix and gelatin in a large bowl. 
  • Using an electric mixer on medium speed, beat in pureed strawberries, eggs, oils, and water until smooth.
    • Pour batter into pans, dividing the batter equally between them.( I used 2- 8 inch pans.)
      • Bake 25-30 minutes at 350 until a wooden pick inserted in the middle comes out clean.
        • Cool in pans 15 minutes. Then, remove from pans and cool completely on wire racks.


          Strawberry Cream Cheese Frosting

          Ingredients

          1/4 cup butter, softened
          8 ounces cream cheese, softened
          3 ounces frozen strawberries in sugar, thawed and pureed
          6 cups confectioners’ sugar
          strawberries for garnish (optional)

          • With an electric mixer, beat butter and cream cheese at medium speed until creamy.
          • Beat in strawberries. 
          • Gradually add confectioners’ sugar and beat until smooth.
          • Spread frosting on cake, covering between layers, on top, and on the sides.
          • Garnish with fresh strawberries.


            Recipe from Bake or Break

            Photography by Diane Marks 
            All rights reserved 2011
            Photos may not be reproduced without permission of
            Diane Marks

            Tuesday, August 9, 2011

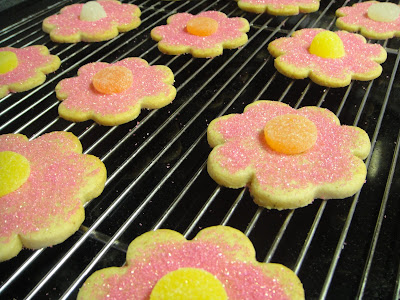
            Sparkling Summer Sugar Cookies

            Sparkling Summer Sugar Cookies

            Ingredients

            Butter Cookie Dough

            1 cup butter, softened
            1/4 cup light brown sugar
            1/2 cup granulated sugar
            1/4 tsp salt ( omit if using salted butter)
            1 egg
            1/2 tsp vanilla
            2-3 drops orange oil 
            2 cups+2 Tblsp all purpose flour
            1/3 cup finely ground pecans or almonds


            Large Gumdrops ( discard the black )

            Colored Sanding sugar

            With an electric mixer, cream butter with granulated and brown sugar. Beat in egg. 
            Add vanilla and orange oil. Gradually mix in flour.
            Mix ground almonds with confectioners sugar. Add to dough.

            Wrap dough in plastic wrap and chill well for easier handling.
            If when rolling or cutting with cookie the dough becomes too soft, simply chill for about 10 minutes.


            When ready to roll out, divide dough into 4 pieces. 
            Place between sheets of wax paper and roll very thin, about 1/8".


            Remove the top sheet of wax paper.

            Using a 3" Blossom cookie cutter, cut Flower shaped cookies.


            Lift away excess dough, gathering scraps. 
            Wrap unused dough in plastic wrap and keep chilled, 
            repeating process until all dough is used.


            Line a cookie sheet with parchment paper. 
             Flip cookies onto parchment paper and gently remove wax paper.

            Bake in a 325 degree oven for 9-10 minutes.

            While cookies are baking, cut gumdrops
            horizontally about 3/4 way down using clean scissors.


            Place the gumdrops cut side down on plastic wrap.
            Set aside.


            When edges of the cookies become a golden brown,
            remove from oven and slide parchment with cookies onto a cooling rack.

            Immediately place the gumdrops, cut side down, in the center of the cookies.

             While still warm, sprinkle the perimeter of the cookies with 
            a colored sanding sugar. I chose pink.
             Remove from parchment paper with a spatula onto a cooling rack
            and cool completely.
             Arrange on a pretty plate and enjoy the glittering cookies.
            You know how fairies love sparkly things and sweets, so leave
            a few out for them tonight too!


            Tutorial and Photography by Jacque Benson
            Copyright 2011
            This material may not be republished or reproduced in any manner without the expressed permission of the author.

            Monday, August 1, 2011

            Making a curved board for your cakes

            Tailor
            I recently made a wedding cake for my niece, Tailor.  She wanted a cake with piping, not molded lace.  I showed her some cakes that I had done in the last year with royal icing piped details and we designed her a small cake.  I wanted the board to be curved up - not flat and since this was for a family member and a gift, I could essentially "play" with this cake. 

            The bottom cake was a 12" cake that was on a 1/2 piece of foam core board cut to the exact size of the cake.  Make a batch of royal icing (I think you could use chocolate in the cooler months or even buttercream to do this with.)

            Royal Icing


            I then used a 13", 14" and 15" round pans turned upside down
            (so that I was actually drawing a slightly bigger circle) and cut them out. 


            Dab Royal Icing on the bottom board and add the next size to the top of it and then do the same to the next board.  Let dry til set.


            Fill in between the boards with royal icing, smoothing as you go


            Go around the board holding your palette knife at an angle to completely fill in the spaces between the boards.


            Set it aside and let it dry to the touch.   


            This can be made way in advance or the day of the wedding. 


            Cover the board with fondant and mark the center the same size as the cake.


            Cut the center out and remove the fondant circle where the cake will be set.  


            Dab in royal icing to hold the cake in place.

            Place cake into the opening on the board.  
            I then ran a bead of royal icing around the seam.  I then sectioned it off to add in the lattice and pearls.


            I added pressed lace pieces below the lattice, piped a ruffle with a shell on top of that, used a pressed flower petunia (you can get the lace piece and petunia cutter/veiner from Jennifer Dontz's Sugar Delites.  I piped royal icing details and used luster dust to bring out a pearl sheen to the board.  I added a piece of tasseled gimp to the edge of the board to finish it off.


              Voila!!!!  A board that is very romantic and part of the cake decor.


            Tutorial and Photography by Denise Talbot
            Copyright 2011
            This material may not be republished or reproduced in any manner without the expressed permission of the author.
            Search This Blog

            The Tutorials This Week Were Generously Shared by

            RHONDA CHRISTENSEN, EARLENE MOORE, BOBBIE NOTO, EDNA DE LA CRUZ & TONI BRANCATISANO

            And to ALL of our Readers...

            Above all, have fun and keep baking!

            Think CHOCOLATE!

            A Very Sweet Tutorial by Bobbie Noto

            A Very Sweet Tutorial by Bobbie Noto
            I was instantly in love when Bobbie Noto shared this cookie with SugarTeachers! She is an amazing talent. For instructions on how to create this adorable cookie, click on the photo and don't forget to subscribe to Bobbie's website!

            Pillow Cake Tutorial by Toni Brancatisano

            Pillow Cake Tutorial by Toni Brancatisano
            How beautiful! A great tutorial shared byToni Brancatisano. Click on photo to see the tutorial!

            Pistachio-Cardamom Cake

            Pistachio-Cardamom Cake
            Click on link for Edna De La Cruz's dee-lish cake recipe.

            Related Posts with Thumbnails