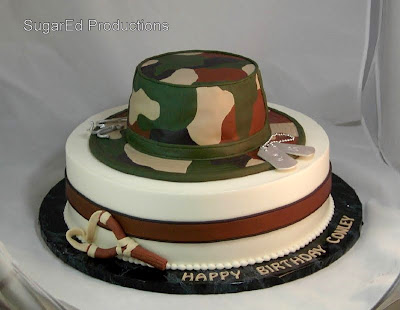
Camouflage: No easy way out.
Raise your hand if your arms and wrists start to ache the minute you get a camouflage cake order.
Yep, I am seeing quite a few hands going up. Doing camo in buttercream is a rather tedious process. Piping blobs of icing in alternating colors, smoothing, repeat, repeat, repeat.... till either you finish your cake or your arm falls off. Whichever comes first.
A while back I got an order for a camo fishing hat for a little boy's birthday. I wanted it to look very realistic; like a real hat. I did not think buttercream camo would give me the look I wanted. So I started to brainstorm about a way to do it in fondant. An easier and less painful way than buttercream.
Guess what. It wast not easier nor less painful. It was more so. It took for-ev-er. My children had birthdays that I missed in the time it took to do this hat. It was very tedious and labor intensive.
BUT..... it looked friggin' awesome man! It looked like a real fabric hat! People were amazed that it was cake. The press came to my house to report about it. The President called to congratulate me. They put up a plaque in my honor at the Wildlife and Fisheries Museum here in New Orleans. Yes folks, it looked just that good.
Oh wait, none of that happened. That was the exhaustion induced dream I had that night.
Anyway, let me show you guys how to do this technique if you ever lose your mind enough to give it a try:
First I carved 2 layers of round cake to have a slight taper up the sides. I also carved some small indentations into the sides to give the look of rumpled fabric, like a truly worn hat. That was crumb coated and covered with a very thin layer of white fondant.
The camouflage layer was made by putting "puzzle pieces" of the colored fondant together side by side. First I penciled the camo pattern onto a piece of paper, marked them the color I wanted each to be, and then cut those pieces out. Each piece was used as a template to cut out the corresponding color of fondant.
Each piece of colored fondant was stuck to a thin layer of white fondant underneath with a little water. This under layer of fondant was there to ensure that the pieces stayed together and did not fall apart when I picked up the larger finished piece. I kept the whole piece under plastic while I was working on it to prevent it from drying out.
When I got one piece big enough to cover the top of the hat, I used a slightly fabric textured mat on it to give a little bit more of a fabric look. That piece was then glued to the top of the hat with water. And the excess hanging over the sides of the top of the hat was cut off with an exacto knife.
The same process was followed to make a piece to apply to the sides. I used two pieces to wrap around the sides, and covered the side seems later.
Here is one side piece in place and the top edge trimmed flush with the top of the cake.
Here is the 2nd side piece in place, about to be trimmed on top.
The same process was done to cover a cardboard cake circle, which served as the brim of the hat. The cake part was put on top of this cake circle.
Then I used strips of green fondant, and some strings from the clay gun to finish off the cake and hide all of the seems. My stitching tool was used to put a stitching effect on the wider strips of green fondant.
The fishing lures and dog tags were made of gumpaste and painted silver.
I doweled the base cake and put the camo hat on top.
And here is the finished product:
Ta dah! Pretty cool huh? It really did come out great and had a very realistic and clean look. My client and I were both very happy.
Give it a try if you have a chance. If you are like me, you will do it once because the cake artist in you must conquer it. Then you will never do it again. LOL
Seriously, I hope you guys try this. It was time consuming, but very fun to watch it all come together. Be sure to send me pics if you do!
Sharon
http://www.sugaredproductions.com>
The photography and tutorial by Sharon Zambito, SugarEd Productions, all rights reserved- 2009
The preceding tutorial was used with the permission of Sharon Zambito and may not be reproduced without the written permission of the author.
The preceding tutorial was used with the permission of Sharon Zambito and may not be reproduced without the written permission of the author.


Wow! That is amazing! Hard work to do - but what a great effect. Thanks for sharing!
ReplyDeleteOne more great tutorial :o)
ReplyDeleteThanks for sharing..