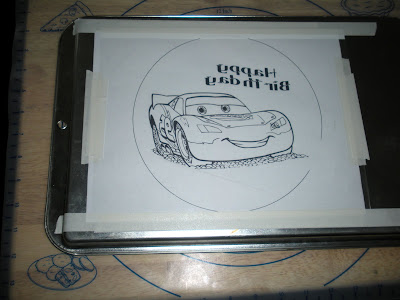
Frozen buttercream transfer (FBCT) is a method of transferring your art to your frosted cake. It's like making a buttercream “plaque” to apply to your cake. It is similar to transferring a design to a frosted cake with gel on waxed paper, and filling in the design with a star tip. It's also comparable to run-in (flood-work) sugar design work, and it will make a beautiful reproduction of your art in buttercream on small as well as very large cakes.
Things you will need:
- 1 batch buttercream Icing
( Use a buttercream recipe that is at least ½ butter to shortening. This seems to peel away from the wax paper more cleanly. ) - Wax Paper
- Tape
- Parchement cones or icing bags
- A Flat portable surface such as a cutting board
1. Choose a graphic image and print it out in reverse/mirror image.
2. Tape your picture down to a solid surface such as a cutting board or cookie sheet turned upside down.
3. Tape a piece of wax paper over your image.
4. Using your choice of outline color. Trace the outlines of the picture.
5. After completing outline. Begin coloring in. Think about your layers. For instance, in this picture,I started with the blue eyes and then filled in the white areas.
6. Continue with your other colors thinking about layers as you go.
7. When you have finished coloring in your graphic, smooth the back while gently pushing without blending your colors underneath. This will settle your frosting into the grooves and create a smooth finished project.
8. An outline was put around the character picture so that I could add a blue background.
9. Fill the entire circle in very carefully as to not disturb the image underneath.
10. Place in freezer on cutting board or cookie sheet for at least 90 minutes. I have left it in for as much as 24 hours.
11. While the transfer is in the freezer, ice your cake to your preference. Do any side designs if you wish.
12. Remove transfer from freezer. Immediately turn over onto iced cake.
13. Gently press transfer into icing. Not too hard!
14. Carefully remove waxed paper. Don't wait too long to do this or you may pull up icing as you pull the wax paper off.
15. Enhance transfer and finish icing cake, as you desire
Here are a few more that I have done using this method.
Tutorial and Photo by Rhonda Christensen
All Rights Reserved- 2009
This material may not be republished or reproduced in any manner without the expressed permission of the author.


Thank you for your great tutorial! I've never seen the side of a cake done like that and was wondering if you could talk a bit about that. Did you use an impression mat on the crumb coat to make sure you got all your little boxes so perfect? Thanks!
ReplyDeleteHi, Rhonda. Thanks for this great fyi. I've always wondered how to make this kind of cake decorating.
ReplyDeleteThanks guys!!
ReplyDeleteSweet Niece...I did use an impression mat on my crumb coat and then filled in with just zigzags.
Thank you, Rhonda!
ReplyDeleteThank you for the tutorial. I was wondering do I have to freeze the image in between these steps?
ReplyDeleteThank you Dhanya! Yes you can freeze in between stops. Sometimes I just wait and let it crust over a little also.
ReplyDeleteWow this is a great Tutorial! I'll have to try this one day.
ReplyDeleteI never knew this technique existed! I can't wait to try it. I actually did a cake that looked almost like this one a month ago, but used a cheap plastic Lightning McQueen image. Thanks!
ReplyDeleteJust wondering if you can leave the the buttercream transfer in the freezer more than 24 hours or will this mess things up? I want to prepare the image well ahead of time, say two days.
ReplyDeleteHow do you store the cake once you have applied the FBT?
ReplyDeleteFantastic! I actually did this with what we call veg cream in the UK. I made a copy of Van Gogh's 'Starry Night' and was very pleased with the results. Thanks for sharing.
ReplyDeleteThis is awesome. It's just the time that I need to transfer my design to my new cake and I was thinking a way for it. Thanks a lot.
ReplyDeleteIt's awesome. Just in time that I need it. Thanks a lot.
ReplyDelete