When you click on a page, scroll past this week's featured photo to view.

WELCOME!

This site is dedicated to sharing what we have learned with you! Enjoy our tutorials, and if you have a question please feel free to ask! I know one of our sugar enthusiasts will either know or try to find the answer.
We all have something to share...and we all have something to learn!


___________________________________________________________


Nothing says Irish like Beautiful Lace

Nothing says Irish like Beautiful Lace
Click on photo for Earlene Moore's tutorial for beautiful fondant lace and have fun with your next cake!


.............................................................................................................................

/////////////////////////////////////////////////////////////////
.............................................................................................................................


Tuesday, October 27, 2009

Making a Frozen Buttercream Transfer


Frozen buttercream transfer (FBCT) is a method of transferring your art to your frosted cake. It's like making a buttercream “plaque” to apply to your cake. It is similar to transferring a design to a frosted cake with gel on waxed paper, and filling in the design with a star tip. It's also comparable to run-in (flood-work) sugar design work, and it will make a beautiful reproduction of your art in buttercream on small as well as very large cakes.


Things you will need:

  • 1 batch buttercream Icing
    ( Use a buttercream recipe that is at least ½ butter to shortening. This seems to peel away from the wax paper more cleanly. )
  • Wax Paper
  • Tape
  • Parchement cones or icing bags
  • A Flat portable surface such as a cutting board

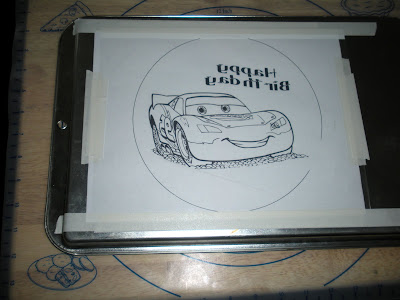
1. Choose a graphic image and print it out in reverse/mirror image.

2. Tape your picture down to a solid surface such as a cutting board or cookie sheet turned upside down.
3. Tape a piece of wax paper over your image.


4. Using your choice of outline color. Trace the outlines of the picture.


5. After completing outline. Begin coloring in. Think about your layers. For instance, in this picture,I started with the blue eyes and then filled in the white areas.


6. Continue with your other colors thinking about layers as you go.


7. When you have finished coloring in your graphic, smooth the back while gently pushing without blending your colors underneath. This will settle your frosting into the grooves and create a smooth finished project.


8. An outline was put around the character picture so that I could add a blue background.


9. Fill the entire circle in very carefully as to not disturb the image underneath.


10. Place in freezer on cutting board or cookie sheet for at least 90 minutes. I have left it in for as much as 24 hours.


11. While the transfer is in the freezer, ice your cake to your preference. Do any side designs if you wish.


12. Remove transfer from freezer. Immediately turn over onto iced cake.

13. Gently press transfer into icing. Not too hard!

14. Carefully remove waxed paper. Don't wait too long to do this or you may pull up icing as you pull the wax paper off.

15. Enhance transfer and finish icing cake, as you desire


Here are a few more that I have done using this method.


Tutorial and Photo by Rhonda Christensen
All Rights Reserved- 2009
This material may not be republished or reproduced in any manner without the expressed permission of the author.

Monday, October 12, 2009

How to Make a Perfect Sugarpaste Bow


This is a tutorial on the nifty little Jem bow makers. If you don't have these, OMG, they are sooooo cool! I offer two sets on the site, each have three different sized bow cutters in them. They are super easy to use. Here's my step by step:


Roll your paste thin (I use pearl clay for this to make really pretty, shiney bows.) Roll paste, rub dough until it's a bit shiney, then add pearl dust. Dust underside. Take one of the cutters, any size, and press into the dough, like using a cookie cutter.


This is what it looks like after you cut it out. Take a tiny pin or something similar and starting at an edge, coax the dough out of the cutter. All parts of your bow are cut in one simple step. The top piece in the picture is the little piece that goes in the middle of the bow loops, the middle piece is the bow and the bottom pieces are the ties for the bow.
Gently moisten the center of the bow and fold one side, then the other, from the outside to the inside to form two bow loops. Take the rectangle looking center piece and moisten the back or the center of the bow and stick that in the middle, forming the sides gently with your fingers.
This is what it should look like, isn't it cute??? Stick on the tails.... you always can clip them shorter if you wish. Completed bow! Easy peasy huh?? You get PERFECT little bows each and everytime you make them.


 Here's a link to find them on the site:
http://jenniferdontz.com/viewproduct.php?itemid=cut068 (Smaller set) 12.50
http://jenniferdontz.com/viewproduct.php?itemid=cut069 (Larger set) 12.50
Once you click on the link, you will see sizes of the completed bows that each package makes.

Tutorial and Photos by Jennifer Dontz - all rights reserved 2009
This tutorial may not be reproduced without permission from the author.

Monday, October 5, 2009

Grim Reaper

I have been asked by quite a few people on how I do my Grim Reaper. I have been asked three times now to make one. They are really fun to do and could be used for Halloween or an Over the Hill birthday.

I've never seen how others do theirs but this is what I came up with.

I first made a circle using 16 to 18 gauge wire. The size depends on how big you are going to make the body.


I then hook four wires to the circle, bring them up and twist them together. I wrap another wire around where the arms will be.


Stuff foil in and around the wire frame, making the it to the fullness desired. Bend the arms into whatever position you wish. I think next time I'll try using rice krispies on the wire.


Time to mold the skull. I took a piece of gumpaste/fondant mixture, sat in front of my computer that had a Grim Reaper or skull image and started sculpting.

When I had finished, I pushed the skull onto the neck of the body. Then make the arms and hands. I wish I would have taken pictures of that!! I just rolled out some gumpaste/fondant into a long sausage shape, flattened one end and cut fingers and a thumb out with a sharp knife. I then smoothed out the fingers with my own fingers, trying to make them look more like bones. Impress knuckles with a knife.

Let the head and arms dry for a day or two and then dust with some black dusting powder. I used black powdered food coloring mix with a tiny bit of corn starch.


Start draping black gumpaste/fondant mixture in strips over the body of the reaper. Do this until it is nice and full.


I then finish the body with two large pieces of gumpaste/fondant to cover each arm and to cover up some of the previous draping and to make it look more like a robe.


Then you can add the hood over the head. This one didn't drape like I wanted it too but you still get the idea.


You can add a skewer under your reaper to go down into a cake if you wish.

Have fun making your Reaper's!! We want to see them!!

Below are the three Reaper's that I have done.


______________________________________________


Tutorial and Photography by Rhonda Christensen 2009. All rights reserved.
This material may not be republished or reproduced in any manner without the expressed permission of the author.
Search This Blog

The Tutorials This Week Were Generously Shared by

RHONDA CHRISTENSEN, EARLENE MOORE, BOBBIE NOTO, EDNA DE LA CRUZ & TONI BRANCATISANO

And to ALL of our Readers...

Above all, have fun and keep baking!

Think CHOCOLATE!

A Very Sweet Tutorial by Bobbie Noto

A Very Sweet Tutorial by Bobbie Noto
I was instantly in love when Bobbie Noto shared this cookie with SugarTeachers! She is an amazing talent. For instructions on how to create this adorable cookie, click on the photo and don't forget to subscribe to Bobbie's website!

Pillow Cake Tutorial by Toni Brancatisano

Pillow Cake Tutorial by Toni Brancatisano
How beautiful! A great tutorial shared byToni Brancatisano. Click on photo to see the tutorial!

Pistachio-Cardamom Cake

Pistachio-Cardamom Cake
Click on link for Edna De La Cruz's dee-lish cake recipe.

Related Posts with Thumbnails