When you click on a page, scroll past this week's featured photo to view.

WELCOME!

This site is dedicated to sharing what we have learned with you! Enjoy our tutorials, and if you have a question please feel free to ask! I know one of our sugar enthusiasts will either know or try to find the answer.
We all have something to share...and we all have something to learn!


___________________________________________________________


Nothing says Irish like Beautiful Lace

Nothing says Irish like Beautiful Lace
Click on photo for Earlene Moore's tutorial for beautiful fondant lace and have fun with your next cake!


.............................................................................................................................

/////////////////////////////////////////////////////////////////
.............................................................................................................................


Tuesday, March 31, 2009

How to Make a Gumpaste Teacup

How to Make a Gumpaste Teacup
The process for making a gumpaste teacup is a simple one. Howevee, it does take some time; so if you need a teacup for a cake tomorrow, you may want to rethink your design. The gumpaste will be very fragile until completely dry, so allow yourself several days to complete the cup.
Supplies Needed:
Gumpaste
Paper Pattern
Fondant Roller and Mat
Cornstarch
PME cutter
Ball tool
Scissors
Palette knife
*Gum Glue
Brush for applying gum glue
China Cup for Molding
Instructions:
Method #1.
When using a china cup with an edge at the base, use the following instructions.
1.Start by using a cup with a large bowl. If your teacup has too steep of a slope, your gumpaste may
have a tendency to slide down. Measure the circumference of the top rim of the cup. Apply a liberal amount of cornstarch inside the cup. Set aside.
2. Cut a parchment paper pattern using the pattern guide above.
3. Dust your mat with cornstarch. Using a firm gumpaste, roll out until thin ( not paper thin, but so that you can see the shadow of your hand when you hold up to light).
Lay your pattern over the gumpaste, and cut along the lines of the pattern using your PME cutter. Lift to make sure your gumpaste does not stick to the board.
4. Dust the board again. Then applying pressing on the long curve of the fondant, began rolling to create more length. This is much like the process of sewing a flounce. Measure now to make sure that you have enough length to reach the circumference with a 3/8" overlap.
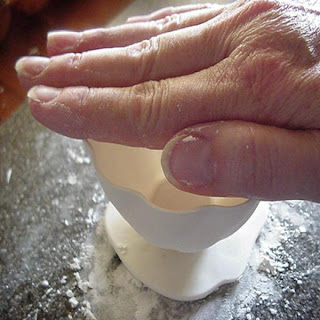
5. Lay one edge of the fondant in the cup lined up directly with the handle on the outside. Gently press the fondant into the cup.
Smooth the fondant into the cup and lay over the top edge. Secure the overlap with a light amount of gum glue. Using your PME cutter, cut the excess from the bottom edge of the cup, then smooth raw seam with a ball tool.
6. Cut most of the excess from the top of the cup using scissors. Carefully lift the gumpaste to assure it is not sticking to the cup. If it is, gently lift the gumpaste, apply more cornstarch and reset the gumpaste into the cup.
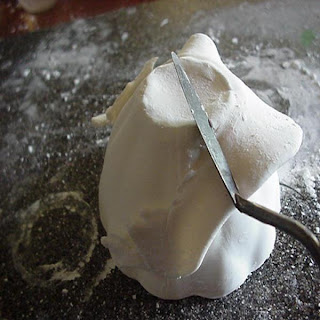
Using a palette knife, trim the edge of the gumpaste to the cup. Carefully lift the gumpaste again and set back into the cup to assure it is not sticking.
( This is an important step. If your gumpaste sticks to the cup, it will break when trying to remove it after it is dry. For the first couple of hours check to be sure it is not adhering to the cup. Be extremely careful with the edge of your gumpaste during this process)
Allow to dry completely. Once cured, you can handle the cup without fear of it breaking easily.

7. When your cup is dry, roll out 1/4" cornstarch on your board. Lightly brush the bottom edge of your cup with gumglue. Press into the gumpaste.
Pick up, turn over and gently trim excess gumpaste with your palette knife.
Smooth inside of bottom using your ball tool.
Once dry, you can spackle any imperfections with royal icing if you like.


**~~~~~~~~~~~~~~~~~~**
Method #2
If you are using a cup with a bowl and no edge where the inside of the cup meets the bottom, you will use this method.
1. Begin by generously applying cornstarch to your cup and board.
2. Roll the gumpaste out very thin in a large circle.
3. Lay over the cup and gently begin smoothing gumpaste into the cup. Don't hurry this process or you will get a crease at the edge.
If your gumpaste doesn't meet the bottom, don't fret.
Gently smooth the gumpaste toward the bottom of the cup and
it will eventually rest into the cup.

4. Cut the edge of the gumpaste with scissors, gently lift away from the cup, then set back in. Using your palette knife, trim the gumpaste to the edge of the cup.
Gently lift the gumpaste to assure it is not sticking to the cup and lay back inside.

Allow to dry completely.

5.When dry. Roll out a 1/4" sausage of gumpaste about 3 inches long. Moisten one edge with glue, the press edges together, creating a 1" circle.
6. Moisten top edge of circle with gumglue and set the cup on top to create the base of your cup.
Use the small edge of your ball tool to make the base of the cup concave if you like.
7. Check to be sure your cup is setting level, then leave upside down to dry completly.

Making and Applying the Handle


8. While your cup is drying, make a handle using the pattern as a guide, or you can create your own handle design. Lay in a cornstarch bath to dry.

9. Mix a very small amount of gumpaste with your gum glue to make a soft paste. Using this paste, attach the handle to the cup.
10. Set aside and allow to dry completely. When dry, you can decorate your cup using petal dust mixed with everclear.

* to make gumglue mix 1/4t Tylose with about 2 T. hot water. Keep in a small sealed container.


Mostly just have fun with it.... Remember-- sugar is supposed to be fun!!
*************************************
Photos and Tutorial by Jacque Benson 2007 all rights reserved.
This material may not be republished or reproduced in any manner without the expressed permission of the author.

Tuesday, March 24, 2009

How to make a Pillow (Cushion) Cake by Toni Brancatisano


BAKE a rectangle or square shaped cake.
For this tutorial, I used my large baking dishes... large rectangles.
1: once you have baked and torted your cake, begin my carving the shape of the cushion ... I like to roughly outline with a knife on the top of the cake.... a very rough guide, but it helps.... you could also use a template.. But I am not usually that organised!!!

2: Carve the 'shape' of the cushion, tapering corners, and curving sides.... this will give the more authentic cushion shape to your cake.

3: cover one side of cushion with BC, then fondant, and flip cake over onto cake board.

4: If you wish, you can emboss the top cover of the cushion... I used the embossing mat to help lift the fondant onto the top of the cushion, and then raised the mat off the fondant once happy with the position of the fondant on the cake.

You can do whatever you like with the design of the 'fabric' for your cushion..... quilting, painting, embossing, etc...............

5: Use a ribbon to help guide your stitching wheel to ensure straight lines.

6 & 7 * Create dents for buttons

* Create cord detail, holding in place with pins until dried in place.
(I leave the pins in overnight).
8: Paint cake as desired. You don't have to paint it of course, but that is what I did for this cushion.. All painted with Lustre Dusts & vodka.
Place your pre-made ballet slippers on the cake.... and hold in place with ROYAL ICING.

9: Voila..... finished cake!
This was my first cushion cake, and remains one of my cakes that I am still proud of. I did make the error of not covering the board, and while painting, flicked colour ... making a splattering all over the board.. hence the heart cut outs............ strategically placed to cover my mess!!!
I have included this photo of a 2 tier cushion cake dummy I did for a trade fair, to give another decorating idea.
*********************************************************
What a brilliant tutorial!
Thank you for being our guest teacher this week Toni!
**********************About Toni**********************
Toni grew up in Melbourne, Australia and as a young adult her travels took her to Italy. She met her husband, and now calls Italy her home... Pietrasanta (LU) on the Tuscan coast. Disappointed that cakes, such as a simple cupcake, were impossible to find there, Toni began making special birthday cakes for her own children. She is now is serving the public with her own special brand of cake artistry!
*****************************************************
Photos, patterns and tutorial by Tony Brancatisano ( Torteditoni ) 2009 all rights reserved
This tutorial was used with the expressed permission of Toni Brancatisano ( Torteditoni )
and may not be reproduced without written permission from the author.

Tuesday, March 17, 2009

Ice Cream Cakes


Supplies needed:


Springform pan


Cake pans


Small off-set spatula


Parchment paper


Cake recipe (of your choice)


Ice cream (of your choice)


Filling (if desired)


Icing (of your choice)


For this ice cream cake I used 8" round cake pans (used 3) and springform pan. Bake your cakes and let cool. Line the springform pan with a circle of parchment paper for easy removal later on. Add the first layer of cake.

Then hot fudge was added on top of the first layer. I also did the top cake layer at the same time so that it could be turned over onto the last layer of ice cream later on. Freeze for about an hour.

Let the desired flavor of ice cream sit out of the freezer for about 15 - 20 minutes to soften. Take out bottom layer and add ice cream, spreading it around with an off-set spatula. I then added the middle cake layer and put it in the freezer for another hour or two.

Now you can add another layer of ice cream and the top layer of cake that already has the hot fudge frozen to it. You can see how the springform pan is not tall enough, but as long as everything is frozen, it will hold it's shape.


Wrap the whole pan with plastic wrap and freeze over night or for a few days.


Take the frozen cake out of the freezer and remove it from the springform pan. I rubbed my hands around it a few times to help release it from the pan. Remove the parchment paper from the cake. Scrape off the excess ice cream that has run down the sides of the cake and to even it out. Place back in the freezer while your get the icing ready.


You can ice it with regular butter cream, real whipped cream, stabilized whipped cream icing, more ice cream or Cool Whip. Whichever you use, you must work quickly!! I gave the cake a crumb coating, just like you would a real cake, and then stuck it back in the freezer for about 15 minutes. Bring the cake back out of the freezer, icing it again and smoothing it with a bench scraper that I use only for cakes. Freeze again for an hour.

About an hour before I was ready to serve the cake, I brought it out of the freezer and decorated it with chocolate butterflies, flowers and I used Magic Shell ice cream topping for the squiggles and dots. Then right back into the freezer again until it's ready to serve.


You can see that I used more cake then I did ice cream!!


Here is another one that I did last year. This ice cream cake had spice cake, Dulce De Leche carmel filling, vanilla ice cream and iced in Cool Whip with sugar cookies around the bottom sides. The possibilities are endless!! Be creative and have fun!!

Tutorial and Photography by Rhonda Christensen
All Rights Reserved 2009
This material may not be republished or reproduced in any manner without the expressed permission of the author.

Monday, March 2, 2009

10 Good Reasons To Rent a Wedding Cake


With the rising cost of weddings and the demand for new styles, many brides have started requesting a dummy wedding cake. At first, Jane at Singleton’s Kitchen, was not that enthusiastic about the idea, as she took much pride in offering many combinations of fresh baked wedding cakes . But after looking into the idea, and doing a few dummy cakes, she decided to be flexible and began to offer cake rentals to her clientale.


If you, as a cake decorator, are interested in a cake rental concept, here is a list of great reasons that Jane Singleton recommends to relay to your bride.

Why rent your wedding cake?

1. It's a better fit for the bride on a tight budget; she can have the cake of her dreams at a fraction of the cost. Sheetcakes can be cut in the kitchen and served to the wedding guest in lieu of a costly tiered wedding cake.


2. The bride has a better chance of booking her wedding date because the cakes can be assembled and decorated ahead of time.


3. Delivery and costly set up fees may be saved if the bride opts to pick up the display cake and sheet cakes before the wedding.


4. If planning an outdoor wedding, a dummy cake reduces worry of invading insects, bees or other pesky critters . It is also less susceptible to damage caused by high temperatures during the summer months; thus allowing the wedding cake to be prominently displayed during the reception from the beginning to the end.


5. Sometimes reception venues add a cutting fee into the package deals and the bride might be unaware she is paying for it. If the charge is per slice, that fee could add up to a hefty amount, sometimes as much as the price of the cake itself. By renting a dummy cake, these extra charges can be avoided.


6. The bride can order her dummy cake via the Internet having it shipped to directly to her home address. UPS is able to package and ship to insure a successful delivery.


7. One may choose to rent the wedding cake with an option to purchase.


8. The designs are limitless because dummies can be made in almost any shape.


9. No special clean up needed. Just return the cake intact to the decorator.

10 Now a bride can have her cake...and eat it too!


Jane Singleton 2009 all rights reserved
This material may not be republished or reproduced in any manner without the expressed permission of the author.

Search This Blog

The Tutorials This Week Were Generously Shared by

RHONDA CHRISTENSEN, EARLENE MOORE, BOBBIE NOTO, EDNA DE LA CRUZ & TONI BRANCATISANO

And to ALL of our Readers...

Above all, have fun and keep baking!

Think CHOCOLATE!

A Very Sweet Tutorial by Bobbie Noto

A Very Sweet Tutorial by Bobbie Noto
I was instantly in love when Bobbie Noto shared this cookie with SugarTeachers! She is an amazing talent. For instructions on how to create this adorable cookie, click on the photo and don't forget to subscribe to Bobbie's website!

Pillow Cake Tutorial by Toni Brancatisano

Pillow Cake Tutorial by Toni Brancatisano
How beautiful! A great tutorial shared byToni Brancatisano. Click on photo to see the tutorial!

Pistachio-Cardamom Cake

Pistachio-Cardamom Cake
Click on link for Edna De La Cruz's dee-lish cake recipe.

Related Posts with Thumbnails