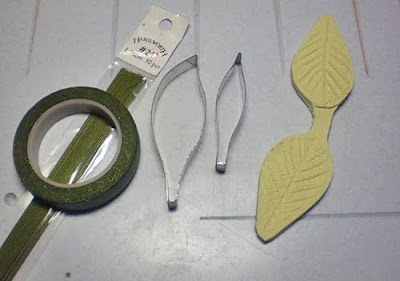
You need the following: Two appropriately sized cutters. These ones are amaryllis cutters from Tinkertech Two. Any lily-like cutter will work for this. A chestnut veiner - or similar. White florist tape and florist wire, gauge 20 and gauge 24. As you can see, I only had green. I think I might have to go shopping for cake toys again soon. What a burden (or not). You also need gumpaste, but you probably already figured that one out. And gum glue and a fine pair of scissors.
Start with the neck. Roll a sausage and shape a beak at the end. Dip a piece of gauge 20 wire in gum glue and wire the neck. Curve it and leave it to dry for 24 hours.
For the wings, roll out gumpaste on a grooved board and cut out 4 large shapes. If you use curved cutters, like here, make sure you have two facing each way. Dip pieces of gauge 24 wire in gum glue and put all the feathers on wire. Then vein them. Make sure you vein them so the dents are on the front and the wire on the back.
Now take your pair of fine scissors and cut the edges so it will look like feathers. With a ball tool, work the outer edges so they curve and look more like feathers. I forgot to take a photo of that, sorry.
For the tail, make 3 smaller feathers the same way as you made the larger ones. Leave all 7 feathers to dry overnight. Curve them over something. An empty Pringles can is the perfect size for the larger feathers (and a great excuse to eat Pringles) and for the tail feathers, an empty roll for kitchen towels work just fine. Or a 4.5 oz Americolor bottle. Leave to dry for 24 hours. Remember, drying times may vary from place to place. Humidity is very low in Denmark right now, so I only had to let them dry for 6 hours, but I know some of my friends from southern parts of USA might need much longer drying time, especially in the summer.
When everything is nice and dry, it's time to assemble. It's quite simple, almost like assembling a lily. With the neck as a center, attach the feathers in pairs, two large feathers on each side.
The tail feathers are taped together as one, then bent at an angle and taped to the neck. I managed to break a feather in the process - always make extra!
Here's a top view of the assembled swan, complete with two and a half tail feathers. These swans are best stored like here, with the wire stuck in a small jar with dried beans. This way they won't break or tilt.
If you wish, you can paint the beaks and make eyes with an edible marker. They make for a great wedding cake topper. I cut drinking straws to appropriate length, and stick them in the cake. Then I stick the wire in the straw, so it wont come in contact with the cake.
You can make the swan any color you like. Have fun!
Sif Jenson -2008
all rights reserved
This material may not be republished or reproduced in any manner without the expressed permission of the author.


